What does it take to deploy a modern JavaScript web app? Your initial response might be, “Copy the files up to the server – how hard could it be?”.
The reality is that deploying modern JavaScript apps is a bit more complicated than simply copying files up to a server. For example, let’s say that you have a Single Page Application (a static web application) built with React, Vue, Angular, or another technology that hits an API, supports user logins and roles, and has to secure specific server-side routes. To deploy the app you’d need to do something like the following at a minimum:
- Build the application and generate the bundles.
- Build the APIs (depending upon what technology is used).
- Setup a server that can host the SPA bundles and run the APIs.
- If the static web app and APIs are on separate servers, configure CORS or a reverse proxy.
- Configure SSL on the server.
- Add a custom domain.
- Configure a default fallback route so that the static web app’s client-side routes work properly and you don’t get a 404.
- Deploy the SPA bundles to the server.
- Deploy the API binaries or scripts up to the server.
Are there any additional considerations to take into account? Definitely! Here are a few additional ones:
- Create a “staging” environment that mirrors the production environment so that you can do testing and QA before going to production.
- Integrate user authentication and authorization from a cloud provider or 3rd party and secure application routes.
- Automate the build process for the static web app and APIs and create a build pipeline.
- Deploy the static web app to a CDN or to multiple servers around the world.
- Deploy the app’s APIs to a cluster of servers if they need to handle variable loads.
- More…
Whew….that is a lot of work! Isn’t it supposed to be easy to deploy a static web app and get it up and running? When you factor in the creation of a “staging” site, authentication/authorization, server configuration, dealing with server-side and client-side routes, global distribution of your app (if required), and other requirements your head can start to spin.
Are there any services out there that can help simplify the process of deploying a static web app and its associated APIs? You always do it yourself using various cloud provider services but you’d have to setup storage, web hosting, APIs, manage build and deployments, SSL certs, custom domains, handle security, and much more. You could also use services like Netlify (https://netlify.com), Firebase (https://firebase.google.com), and many others as well.
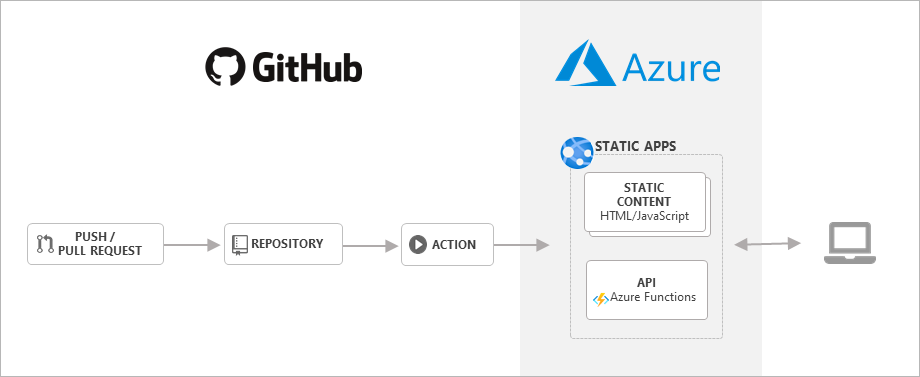
Fortunately, there’s a new kid/service on the block. Azure Static Web Apps. I already use Azure for all of my deployments so I’m really excited about this new functionality Microsoft is adding to Azure. Let’s look at how it works.
If you’d prefer to watch a video, here’s one I created that also goes through the steps discussed in this post.
Getting Started with Azure Static Web Apps
Introducing Azure Static Web Apps
Microsoft announced the Azure Static Web Apps service at their Build 2020 conference. I was fortunate to get early access and have been really impressed with the functionality they’re providing. Since then, they’ve made the service “GA” (generally available) and currently support 2 plans. The free plan allows you to get started absolutely free while the standard plan includes all of the free features as well as the ability to customize functionality such as authentication and APIs.
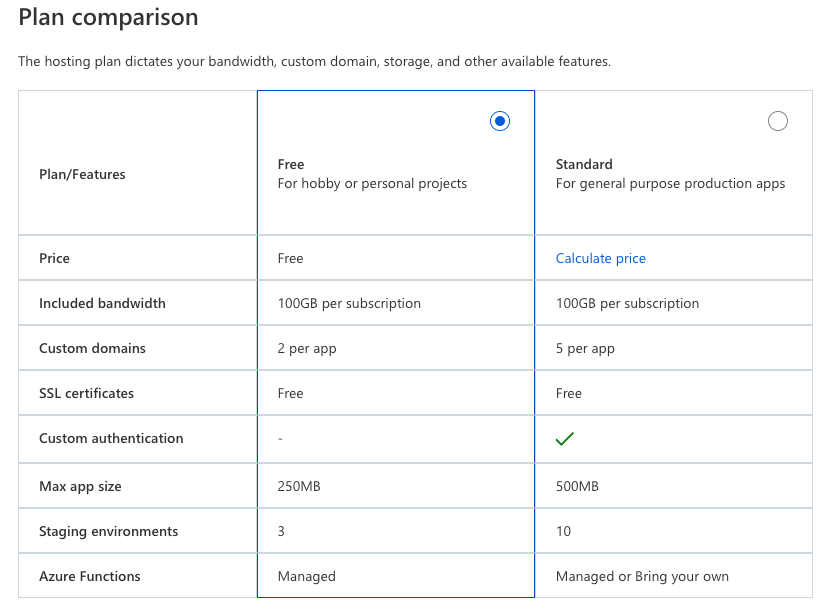
You can view pricing details for the standard plan at https://azure.microsoft.com/en-us/pricing/details/app-service/static.
Here are the basic steps to get started with Azure Static Web Apps:
- Push your app code to Github.
- Sign-in to the Azure Portal, search for “Static Web App”, and select the Create button.
- Fill out the form, sign-in to Github, and select your repository and branch.
- Define where your app, APIs, and build output are located.
- Select the Create button and watch the magic happen!
- View your static web app.
Before going through these steps you’ll need to have an Azure account. If you don’t have one you can setup a free trial account at https://azure.microsoft.com/free. Let’s walk through each of these steps.
Step 1. Push Your App Code to Github
If you’re already using Github to store your code then this first step is the easiest of all. If you’re new to Github check out how to started using it. Believe it or not, once your static web app is on Github and your app is ready to try out, the hard part is done!
If your app has APIs that you want to host in Azure then you can use Azure Functions (Node.js 12, .NET Core 3.1, or Python 3.8 are supported – check the docs for updates). You can use Azure Static Web Apps without any APIs at all of course. Maybe you have a truly static web app that doesn’t need to call out to a server for data. Or, if your app does have APIs and they’re hosted somewhere else that’s fine too. They’re flexible!
If your app does have APIs that you want to host in Azure and you’re new to Azure Functions, here’s a quick overview of what they are and what you can do with them. Azure Functions provide a “serverless” environment for hosting a variety of APIs that can serve data over HTTP or integrate with other Azure services. An Azure Function written with JavaScript consists of an index.js file that contains your code as well as a function.json file that defines the inputs and outputs for the function. Here’s an example of a function that is triggered by an HTTP request and returns JSON: function that is triggered by an HTTP request and returns JSON:
const customers = require('../data/customers.json');

module.exports = async function (context, req) {
    context.res = {
        headers: {
          'Content-Type': 'application/json'
        },
        body: customers
    };
}
The input and output bindings (the type of data that flows in and out of the function) can be defined in the function.json file. Here’s an example of input/output bindings for the previous function:
{
  "bindings": [
    {
      "authLevel": "anonymous",
      "type": "httpTrigger",
      "direction": "in",
      "name": "req",
      "methods": [
        "get"
      ],
      "route": "customers/"
    },
    {
      "type": "http",
      "direction": "out",
      "name": "res"
    }
  ]
}
This function is triggered by an HTTP GET request to https://[yourserver.com]/api/customers. The incoming request object is named req. The function returns a response using an object named res. Although a complete discussion of Azure Functions is outside the scope of this post, they’re really powerful and definitely worth looking into more.
Once your static web app and Azure Functions APIs are up on Github, you’re ready to create a static web app service in Azure. Let’s look at that process.
Step 2. Sign-in to the Azure Portal, Search for “Static Web Apps”, and click the Create button

Visit https://portal.azure.com, sign-in, and use the search box at the top to locate the Static Web Apps service. Select it to get to the service’s information page. Take a few moments to read about what the service offers and when you’re ready, click the Create button to get started.
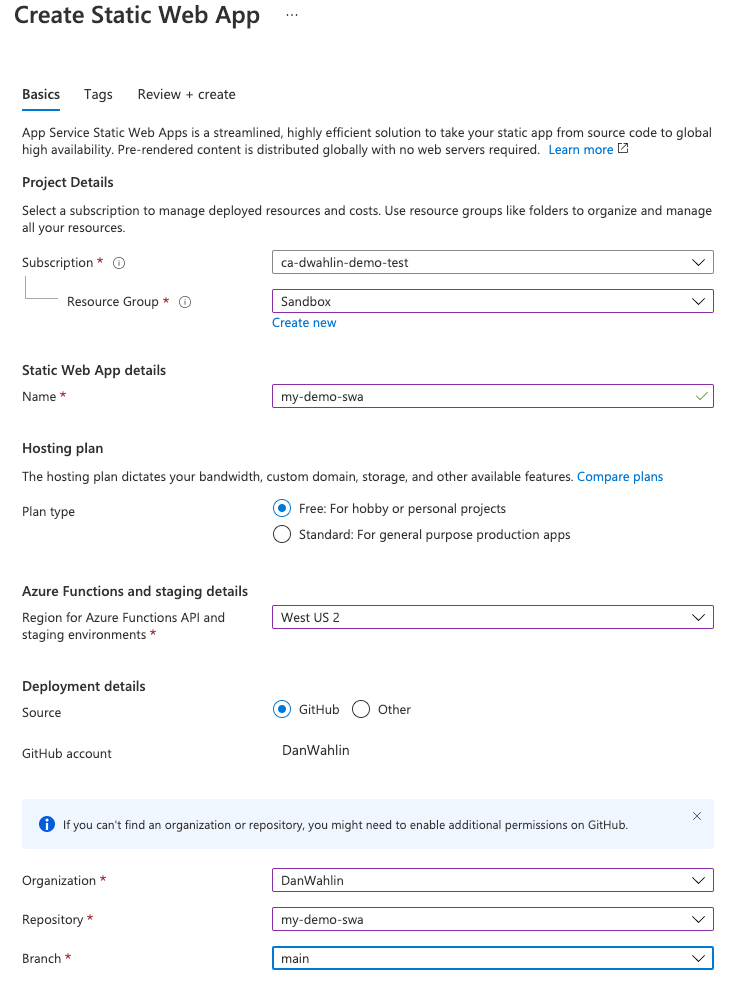
Step 3. Fill Out the Form, Sign-in to Github, and Select Your Repository
In this step you’ll fill out the Static Web Apps form and sign-in to Github to select your repository. Here are the fields to fill out:
- Select your Azure subscription.
- Create or select a Resource Group (a container that holds related resources such as your new static web app functionality)
- Name your app.
- Select a region.
- Select a SKU/plan.
- Sign-in to Github and select your org, repo, and branch.
Once you’re done filling out the form click the Next: Build > button.
Step 4: Define Where Your App, APIs, and Build Output are Located
The next step is to define where your app is located in the repository, where your Azure Functions APIs are located, and the directory where your build artifacts (your bundles) are located. You can even preview the workflow file that will be added to your Github repository.
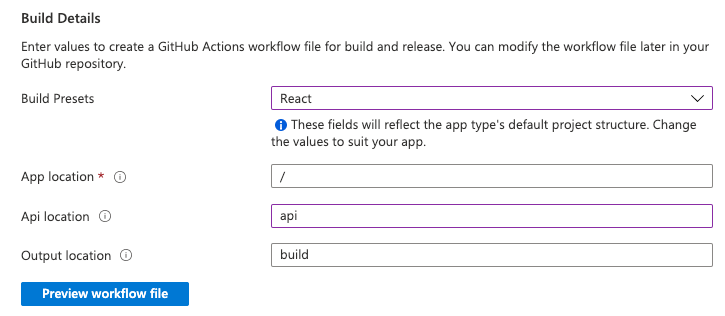
After entering that information click the Review + create button.
WARNING: Make sure you enter correct values for your root app location (where your package.json file lives), API location (where your Azure function APIs live if you’re publishing them to Azure), and whatever directory your app builds to (note that this is relative to where your app location is) because this will NOT work otherwise. I’ll provide more information about checking out your build status later in this post.
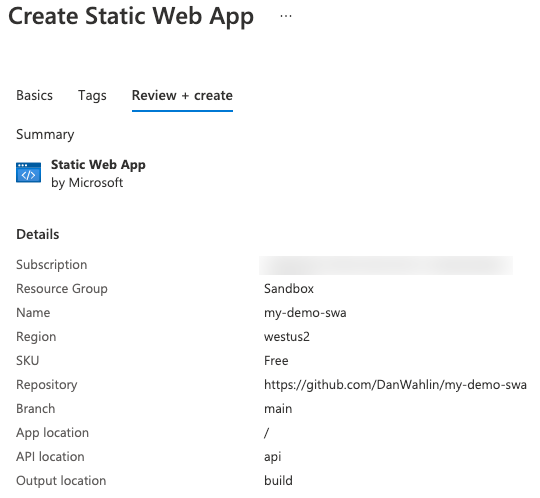
5. Click the Create Button and Watch the Magic Happen!

It’s time to launch your static web app! Review the summary information provided and then click the Create button. Go grab a coffee, kick back, relax, and watch a (super short) YouTube video while a Github Action builds your code and deploys it to Azure automatically.
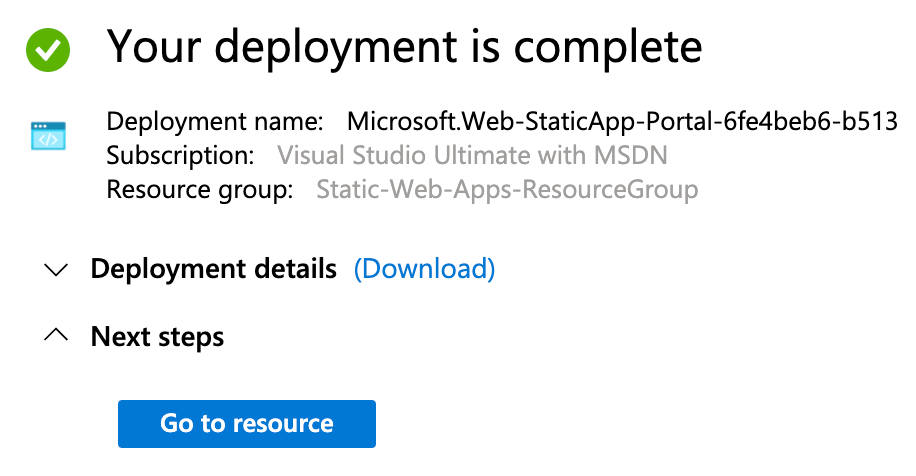
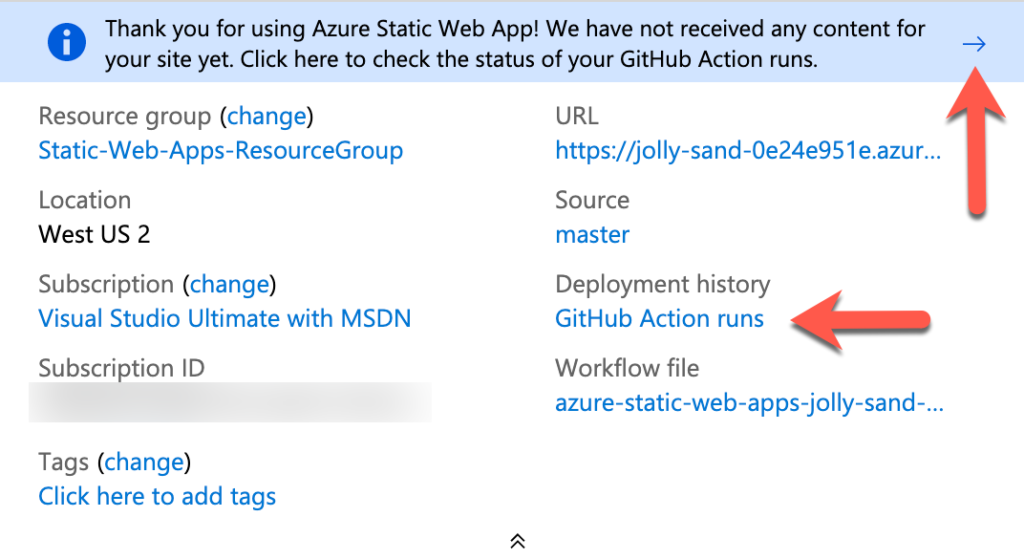
Step 6: View Your Static Web App
OK – coffee time’s over! Once your static web app is created, click the Go to resource button.
Go to your newly created static web app and click the site’s URL to view it.
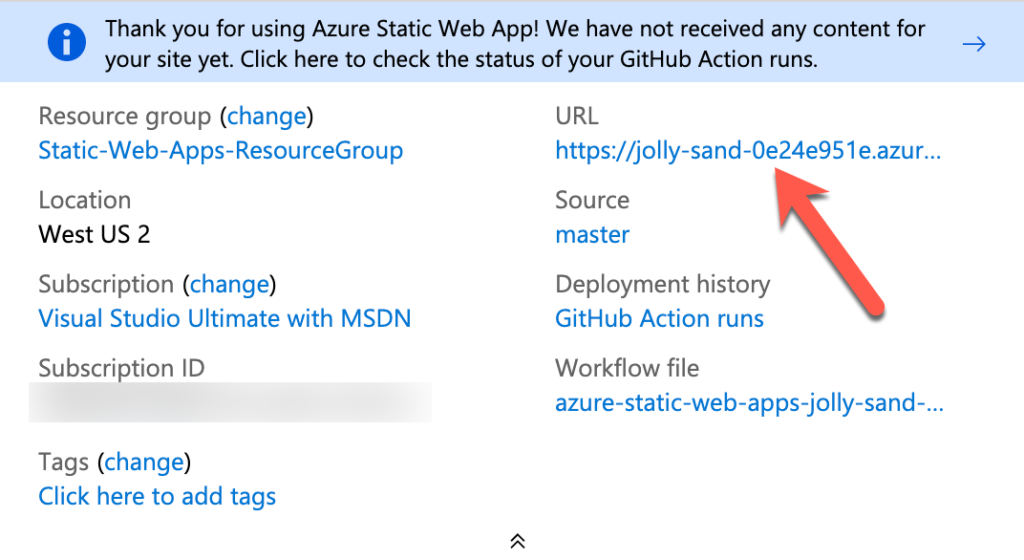
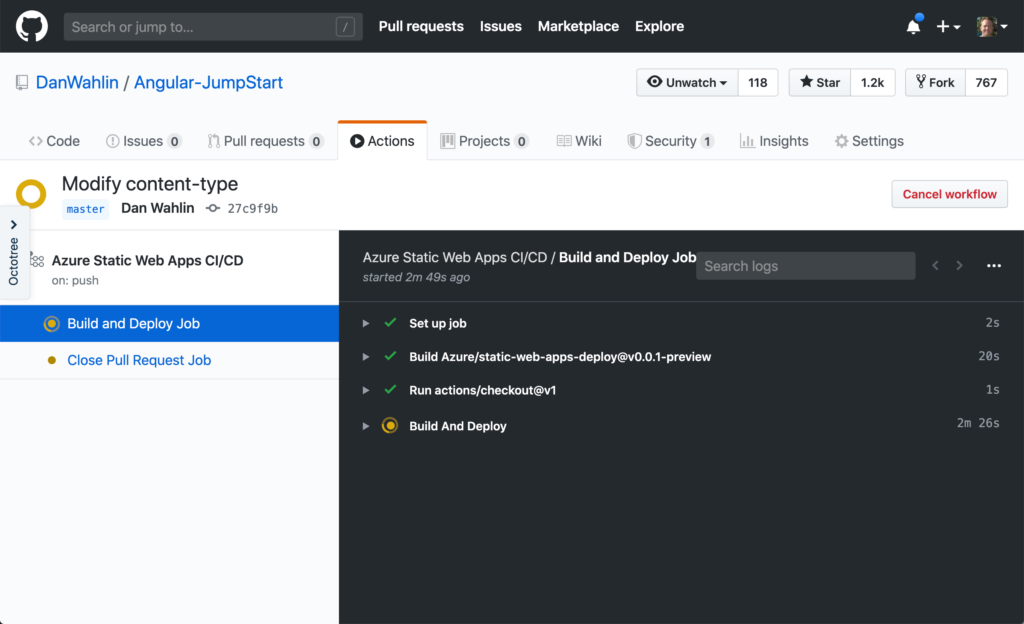
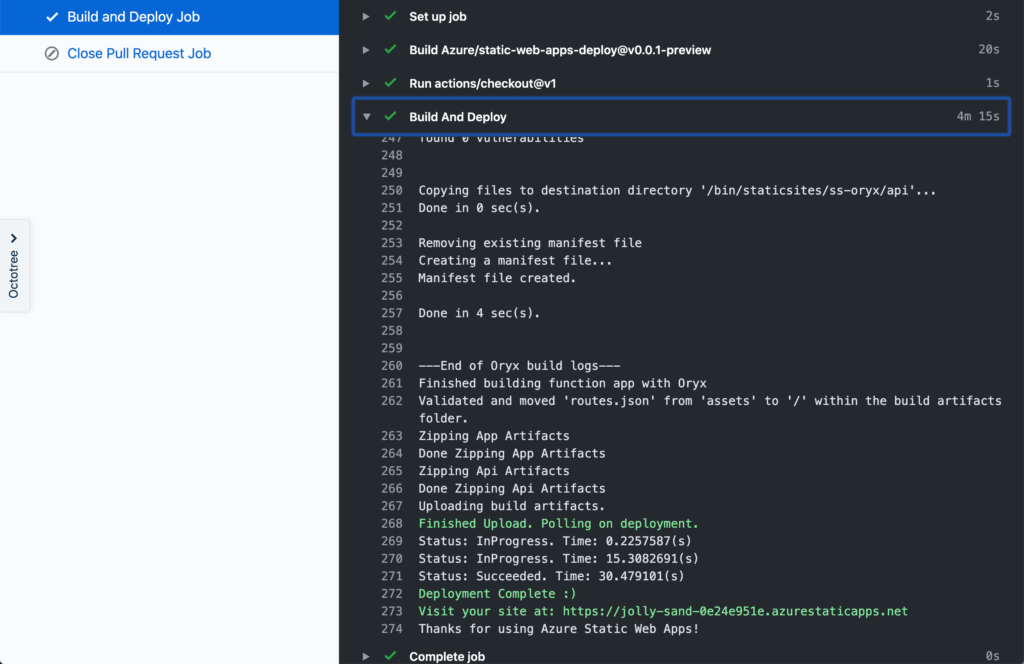
If you’d like to see the build in action on Github, click the blue arrow above the site’s URL (note that this will disappear after a while) or the GitHub Action runs link:
Here’s an example of what the Github Action build created in your repository by Azure Static Web App looks like. This repository is located at https://github.com/DanWahlin/Angular-JumpStart if you want to try one out that already has an app and functions available. Every time you push code to your chosen repository branch the Github Action build process kicks off automatically.
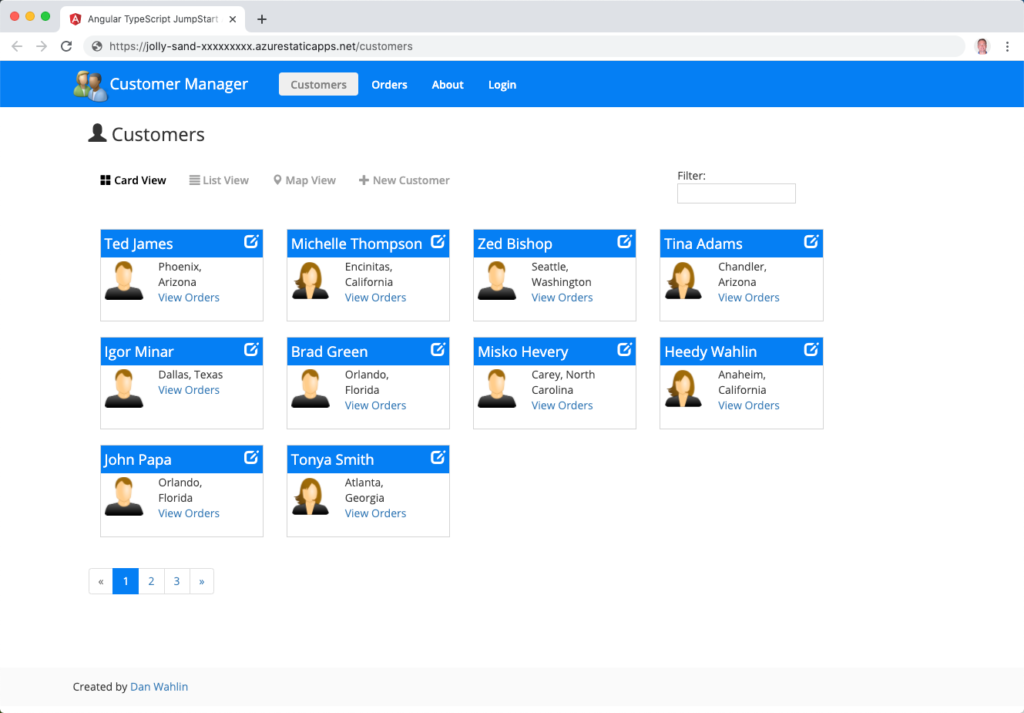
Let’s look at an app that was deployed to Azure Static Web Apps.
Deploying a Static Web App and API
To try out the new Azure Static Web Apps functionality I decided to use a sample Angular project I have on Github called Angular Jumpstart. It originally relied on Node.js/Express for the back-end APIs and is easy to get going locally. See the README.md file for more details on getting it running on your machine.
The challenge with the original version of the app was that I needed to understand what Azure Static Web Apps wanted and I needed to convert my existing Node.js RESTful APIs into Azure Functions (I no longer need a server to host the APIs on which is great!). You can find documentation on the conversion process on the Microsoft docs site if you’re interested.
After getting everything in place I decided there was no time like the present to get things started. I went through the steps listed above to create the Azure Static Web App and my first build started on Github. Looking good….looking good….damn…it failed. I hadn’t read any of the docs at this point but I figured it’d be interesting to see how things went without any modifications (aside from the Node –> Azure Functions conversion).
It turned out that the first build failed due to putting an incorrect path in for the build output (step 4 above). I fixed that, got the build working, and successfully deployed the site. Success….or so I thought. While the shell of the site loaded, none of the API calls worked which meant no data loaded into the web page.
I jumped on a call with my buddy John Papa from Microsoft (fortunately for me he had been spending a lot of time with this new service) and he had me adjust a few things in my functions. The main change was “api” needed to be taken out of the route values in the function.json files. For example, api/customers was converted to customers.
Once that change was made along with a few other minor ones, the site sprung to life. However, if I refreshed the page I got a 404 error because the route was evaluated on the server-side instead of redirecting back to index.html. Azure Static Web Apps to the rescue! They have a nice routing solution (which I’m only going to scratch the surface on in this post) that lets you handle the proper redirect to the static web app client-side routes.
You can add a staticwebapp.config.json file into the root of your project to handle redirecting:
{
  "navigationFallback": {
    "rewrite": "/index.html"
  }
}
Once I added the staticwebapp.config.json file the site was rebuilt/redeployed and everything worked as expected. You can get more information about routing, handling client-side redirects, and even securing server-side APIs using authentication/authorization in the Azure Static Web Apps docs.
Now any time I want to make a change I simply push it up to Github, that kicks off the Github Action build process and deployment, and the change is in production on Azure within a few minutes. Pretty amazing! Feel free to clone the Angular Jumpstart project and try out the steps shown earlier on your own.
Conclusion
Although deploying modern JavaScript apps can be pretty challenging when you factor in all of the required tasks, Azure Static Web Apps greatly simplifies the process and makes it a piece of cake to deploy an app once you have it setup and configured.
NOTE: If you’re building Microsoft Teams apps then Azure Static Web Apps can provide a great way to host your Teams app depending on the technology used by the app!
So what’s next? There’s quite a bit more you can do with Azure Static Web Apps such as:
- Add a custom domain to your static web app using the Azure portal.
- Create a staging slot in Azure Static Web Apps to test your app (for example test a pull request) before swapping it over to production.
- Add authentication/authorization using Microsoft, Google, Facebook, Twitter, or Github. You can add users, associate roles with back-end routes and more.
- Although this example shows an Angular application, you can deploy many other app types as well:
- React
- Vue
- Hugo
- Svelte
- Gatsby
- Next.js
- More…
Take Azure Static Web Apps for a spin and see what you think! Here are some additional links you can visit to learn more.
- Static Web Apps docs:
https://aka.ms/azure-swa-docs - Static Web Apps Learn modules (Angular, React, Svelte, or Vue JavaScript app and API):
https://aka.ms/azure-swa-learn - Static web app with the Gatsby static site generator:
https://aka.ms/azure-swa-gatsby