

Image from the Marvel Developers API
NOTE: Marvel recently retired their API so it is no longer available unfortunately. I’m leaving this post up for historical purposes since the approach is still relevant for MCP servers. If you’d like to see a similar example, check out my DC Comics MCP server.
Summary
-
MCP enables AI models to access external APIs through standardized tool calls, supercharging their capabilities with real-time data and actions.
-
The Marvel MCP server provides “tools” for interacting with the Marvel API, which is useful for fetching character and comic data and integrating it with AI systems. Even if you’re not coding for the Avengers, it’s a great way to learn MCP integration and create an MCP server for your own APIs.
Introduction to Model Context Protocol (MCP)
Ever wish your AI assistant could tap into external APIs, fetch live data, or interact with tools beyond its built-in knowledge? That’s exactly what the Model Context Protocol (MCP) enables. MCP is a standardized way for AI systems to discover available tools, send them inputs, and get back results in a consistent format. It’s a powerful way to extend what AI can do—especially for things like making API calls or querying databases, which models can’t do on their own. Think of it as the Rosetta Stone between AI models and the outside world.
To make this real (and fun), I put together a Marvel-themed MCP server. It acts as a bridge to the Marvel API, letting you pull in data about characters, comics, and more—perfect for giving AI apps some superhero flair.
Now, I realize that unless you’re working at Stark Industries, you probably won’t be using Marvel data in your day job. But hey, capes or not, this project gives you a practical blueprint for building your own API-connected MCP server that works with tools like Claude Desktop or GitHub Copilot in VS Code.
Project Overview
I originally built the Marvel MCP server project to experiment with integrating API data into AI systems. I needed some realistic APIs to use and the Marvel APIs worked really well. They’re rich, fun to explore, and perfect for a demo that’s a little more exciting than pulling weather data.
The project’s structure includes several key files:
-
src/index.ts: Sets up the MCP stdio server and handles requests for listing and calling tools.
-
src/tools/tools.ts: Defines MCP tools used to interact with the Marvel API, each with a description, input schema, and handler function. Each tool is in its own folder and defines the schemas it needs and the overall functionality.
-
src/tools/schemas.ts: Contains shared Zod schemas used by tools that call the Marvel API. The schemas are generated from the Open API spec available from https://gateway.marvel.com/docs/public.
-
src/utils.ts: Provides utility functions used by the MCP server tools to handle authentication (via public and private keys that the Marvel Developer API provides) and HTTP requests.
-
src/instructions.ts: Provides general prompts used across all tools.
-
src/server.ts and src/streamable-http.ts: The MCP server can be run as stdio (that’s the default option to use it in an MCP host - more on this later). However, these two files enable running the new streamable HTTP option available.
Let’s walk through several of these files and highlight key aspects that are used to create the MCP server.
The Role of Schemas
APIs can have input parameters and return a specific type of response. MCP tools need to know what to pass to an API endpoint and the type of response to exact. That’s where schemas come into play. Each tool folder such as tools/get_characters has the schemas used by the tool and well as the functionality to call the target API endpoint. Schemas define input parameters passed from the tool to the API (filters, IDs, etc.) as well as the shape of the response (ID, name, description, etc.). Schemas rely on the Zod npm package to define an object’s structure and data types.
Here’s an example of how Zod is used to create GetCharactersSchema which is located in the tools/get_characters/schemas.ts file.
CharactersSchema
export const GetCharactersSchema = z.object({
  name: z.string().optional(),
  nameStartsWith: z.string().optional(),
  modifiedSince: z.string().optional(),
  comics: z.string().optional(),
  series: z.string().optional(),
  events: z.string().optional(),
  stories: z.string().optional(),
  orderBy: z.string().optional(),
  limit: z.number().min(1).max(100).optional(),
  offset: z.number().optional(),
});
This schema defines the input parameters used to fetch characters from the API:
-
Optional filters like name, nameStartsWith, and modifiedSince for searching and date filtering.
-
Optional comma-separated lists for comics, series, events, and stories to filter by related entities.
-
orderBy for sorting results, and limit and offset for pagination, with limit constrained between 1 and 100.
In addition to input schemas, there are also output schemas as mentioned earlier. Here’s an example of CharacterSchema which represents the shape of the data in the API response. Because it’s used across multiple tools, it’s defined in tools/schemas.ts.
CharacterSchema
export const CharacterSchema = z.object({
  id: z.number(),
  name: z.string(),
  description: z.string(),
  modified: z.string(),
  resourceURI: z.string(),
  urls: z.array(UrlSchema),
  thumbnail: ImageSchema,
  comics: ListSchema(ComicSummarySchema),
  stories: ListSchema(StorySummarySchema),
  events: ListSchema(EventSummarySchema),
  series: ListSchema(SeriesSummarySchema),
});
This schema defines a Marvel character, including:
-
id: A numeric identifier.
-
name: The character’s name as a string.
-
description: A character description.
-
modified: A string representing the last modification date.
-
resourceURI: The canonical URL for the character.
-
urls: An array of UrlSchema objects, likely for external links.
-
thumbnail: An ImageSchema for the character’s image.
-
comics, stories, events, series: Lists with respective summary schemas.
This schema ensures that any character data received from an API call conforms to the schema structure, which helps an AI system better understand the data it receives.
Creating schemas by hand is really tedious, so I used Grok 3 to convert portions of Marvel’s OpenAPI spec into the desired schemas. GitHub Copilot, ChatGPT, and others should be able to handle the conversion for you as well.
The Role of Tools
One of the key features of MCP servers is tools. Tools allow an LLM used within an AI system to perform actions through the MCP server. Think of tools as buttons the AI can press to go do something useful—like asking the Marvel API for data.
The src/tools/tools.ts file defines several tools for the Marvel MCP server, each with a description, schema, and handler. Here’s an example of the get_characters tool used to call the Marvel API.
get_characters Tool
export const get_characters = {
    description: `Fetch Marvel characters with optional filters.`,
    schema: GetCharactersSchema,
    handler: async (args: any) => {
        const argsParsed = GetCharactersSchema.parse(args);
        const res = await httpRequest('/characters', serializeQueryParams(argsParsed));
        return CharacterDataWrapperSchema.parse(res);
    }
};-
Description: Fetches Marvel characters, allowing optional filters like name, modification date, and related entities.
-
Schema: Uses GetCharactersSchema, ensuring inputs are validated against expected parameters.
-
Handler: Parses the input using GetCharactersSchema, serializes query parameters using serializeQueryParams from utils.ts, makes an HTTP request to Marvel’s /characters API using httpRequest (also in utils.ts), and parses the response with CharacterDataWrapperSchema. This ensures the response conforms to the expected character data structure and helps the AI system understand the data it receives.
Another tool is get_comics_for_character:
export const get_comics_for_character = {
    description: `Fetch Marvel comics filtered by character ID and optional filters.`,
    schema: GetComicsForCharacterSchema,
    handler: async (args: any) => {
        const { characterId, ...rest } = GetComicsForCharacterSchema.parse(args);
        const res = await httpRequest(`/characters/${characterId}/comics`, serializeQueryParams(rest));
        return ComicDataWrapperSchema.parse(res);
    }
};-
Description: Fetches comics featuring a specific character, with additional optional filters like format, date range, and more.
-
Schema: Uses GetComicsForCharacterSchema, ensuring input validation.
-
Handler: Parses the input, extracts characterId and other parameters, makes a request to /characters/{characterId}/comics with serialized query parameters, and parses the response with ComicDataWrapperSchema, ensuring comic data integrity.
The src/tools/tools.ts file aggregates all of the available tools:
import { get_characters } from './get_characters/index.js';
import { get_character_by_id } from './get_character_by_id/index.js';
import { get_comics_for_character } from './get_comics_for_character/index.js';
import { get_comics } from './get_comics/index.js';
import { get_comic_by_id } from './get_comic_by_id/index.js';
import { get_characters_for_comic } from './get_characters_for_comic/index.js';

export const marvelTools = {
    get_characters,
    get_character_by_id,
    get_comics_for_character,
    get_comics,
    get_comic_by_id,
    get_characters_for_comic
};

export type ToolName = keyof typeof marvelTools;
These tools demonstrate how the server abstracts Marvel API calls, providing a standardized interface for MCP interactions. The input schemas help the AI system understand what data it needs to pass and the output schemas help the AI system’s LLM understand the data it recevied.
Utility Functions
Looking at the previous tools, you may have noticed that an httpRequest() function handles the calls to the Marvel API endpoints. It’s located in src/utils.ts. Here’s what the function looks like.
httpRequest()
export async function httpRequest(endpoint: string, params: Record<string, string | number | undefined> = {}) {
  const url = new URL(`${MARVEL_API_BASE}${endpoint}`);

  const authParams = createAuthParams();
  url.searchParams.set('ts', authParams.ts);
  url.searchParams.set('apikey', authParams.apikey);
  url.searchParams.set('hash', authParams.hash);

  for (const [key, value] of Object.entries(params)) {
    if (value !== undefined) {
      url.searchParams.set(key, String(value));
    }
  }

  const res = await fetch(url.toString());
  if (!res.ok) {
    const text = await res.text();
    throw new Error(`Marvel API error: ${res.status} - ${text}`);
  }

  return res.json();
}-
Purpose: Makes HTTP requests to the Marvel API, handling authentication with timestamp, API key, and hash, and ensuring error handling for non-OK responses.
-
Usage: Called by tool handlers to fetch data, ensuring secure and reliable API interactions.
The MCP Server
MCP servers can support a variety of transport types including stdio, SSE, and HTTP streaming (the newest option). Think of your MCP server quietly listening like Jarvis in the background, ready to take orders via stdin and reply via stdout as an AI system needs more information. The Marvel MCP server uses stdio by default since it’s currently supported by most MCP hosts such as Claude Desktop and GitHub Copilot in VS Code. However, the project also supports the streamable HTTP transport as mentioned earlier.
An MCP server running with stdio acts like a background process that listens for JSON-formatted tool calls via standard input, processes the requests (like calling an API or performing a task), and then returns the results via standard output.
Here’s some of the key code in the Marvel MCP server’s src/index.ts file including how the server is initialized, how tools are exposed to MCP clients, and how individual tools are invoked.
Initializing the MCP Server
import { Server } from '@modelcontextprotocol/sdk/server/index.js';
import { StdioServerTransport } from '@modelcontextprotocol/sdk/server/stdio.js';
import { CallToolRequestSchema, ListToolsRequestSchema } from '@modelcontextprotocol/sdk/types.js';
import { zodToJsonSchema } from 'zod-to-json-schema';
import { marvelTools, ToolName } from './tools.js';

...

const server = new Server(
  {
    name: 'marvel-mcp',
    version: '1.5.0',
    description: 'An MCP Server to retrieve Marvel character information.',
  },
  {
    capabilities: {
      tools: {},
    },
  }
);- Initializes the MCP server with metadata, including name, version, and description, and specifies that the server supports tools.
List Tools Request Handler
server.setRequestHandler(ListToolsRequestSchema, async () => {
  return {
    tools: Object.entries(marvelTools).map(([name, tool]) => ({
      name,
      description: tool.description,
      inputSchema: zodToJsonSchema(tool.schema),
    })),
  };
});- Handles requests to list tools, mapping each tool from marvelTools (shown earlier) to include name, description, and input schema.
Call Tool Request Handler
server.setRequestHandler(CallToolRequestSchema, async (request) => {
  console.error(`Processing tool request: ${request.params.name}`);

  if (!request.params.arguments) {
    throw new Error('Arguments are required');
  }

  const { name, arguments: args } = request.params;

  if (!(name in marvelTools)) {
    throw new Error(`Unknown tool: ${name}`);
  }

  const tool = marvelTools[name as ToolName];

  if (!tool) {
    throw new Error(`Tool not found: ${name}`);
  }

  try {
    const result = await tool.handler(args);
    console.error(`Completed tool request: ${name}`);

    return {
      content: [{ type: 'text', text: JSON.stringify(result) }],
    };
  } catch (error) {
    if (error instanceof Error) {
      throw new Error(`Error processing ${name}: ${error.message}`);
    }
    throw error;
  }
});- Handles requests by an AI system to call a specific tool, validating the input, checking if the tool exists, executing the handler, and returning the result as JSON.
This setup ensures the server can respond to MCP protocol requests, providing a robust interface for tool interactions.
Using the MCP Server in an MCP Host
Now that you’ve got your MCP server built, how do you connect it to something like Claude or Copilot? It’s easier than you might think. Just a bit of configuration and you’re off to the races.
For example, to use the Marvel MCP server with Claude Desktop you can add the following JSON into the claude_desktop_config.json file.
Claude Desktop MCP Server Configuration
{
  "mcpServers": {
    "marvel-mcp": {
      "type": "stdio",
      "command": "npx",
      "args": [
        "-y",
        "@codewithdan/marvel-mcp"
      ],
      "env": {
        "MARVEL_PUBLIC_KEY": "YOUR_PUBLIC_KEY",
        "MARVEL_PRIVATE_KEY": "YOUR_PRIVATE_KEY",
        "MARVEL_API_BASE": "https://gateway.marvel.com/v1/public"
      }
    }
  }
}
To use the server with GitHub Copilot in VS Code you can add the following section to your settings:
VS Code MCP Server Configuration
"mcp": {
 "servers": {
     "marvel-mcp": {
         "command": "npx",
         "args": [
             "-y",
             "@codewithdan/marvel-mcp"
         ],
         "env": {
             "MARVEL_PUBLIC_KEY": "YOUR_PUBLIC_KEY",
             "MARVEL_PRIVATE_KEY": "YOUR_PRIVATE_KEY",
             "MARVEL_API_BASE": "https://gateway.marvel.com/v1/public"
         }
     },
 }
}
You’ll notice that two keys are needed. You can get those from the https://developer.marvel.com website after registering.
What if you don’t want to store keys directly in the file? With VS Code you can use the following confirmation. When you start the MCP server you’ll be prompted to enter the key and it’ll store it for you (but not show it). Here’s what that configuration looks like:
VS Code MCP Server Configuration with Inputs
"mcp": {
"inputs": [
{
"type": "promptString",
"id": "marvel-public-api-key",
"description": "Marvel public API Key",
"password": true
},
{
"type": "promptString",
"id": "marvel-private-api-key",
"description": "Marvel private API Key",
"password": true
}
],
"servers": {
"marvel-mcp": {
"command": "npx",
// "command": "node",
"args": [
"-y",
"@codewithdan/marvel-mcp"
// "/PATH/TO/marvel-mcp/dist/index.js"
],
"env": {
"MARVEL_PUBLIC_KEY": "${input:marvel-public-api-key}",
"MARVEL_PRIVATE_KEY": "${input:marvel-private-api-key}",
"MARVEL_API_BASE": "https://gateway.marvel.com/v1/public"
}
}
}
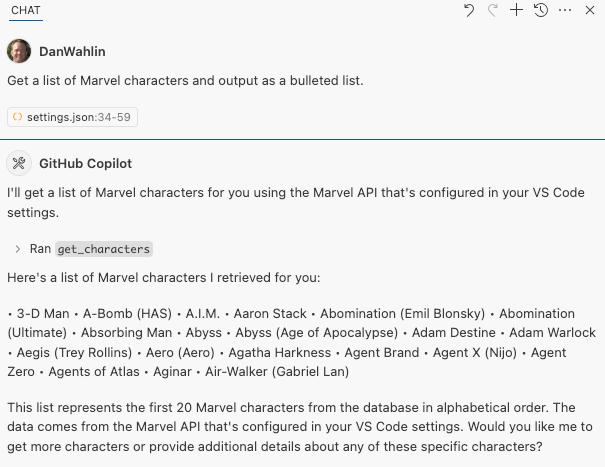
}Once the configuration is in place and the MCP server is started by selecting the Start option above “marvel-mcp” in the file, the @codewithdan/marvel-mcp package will be downloaded from npm and the server will be run locally. From there, a user can interact with the MCP host and ask questions about Marvel characters and comics. Here’s an example of doing that from GitHub Copilot.
Examples of additional prompts could include:
What comics is Wolverine in?
Which characters appear in the Avengers comics?
What characters are in the Hedge Knight II: Sworn Sword (2007) comic?
Once the MCP server’s tools are known to the MCP host, the AI system should call them anytime it needs an answer that it can’t provide on its own.
Conclusion
And there you have it—your very own MCP server powered by the Marvel universe! While you might not be saving the world with superhero data in your day job, this project gives you a solid blueprint for integrating any external API into an AI system using the Model Context Protocol.
Peek under the hood at the code, schemas, tools, and server setup, and you’ll be well on your way to building your own API-powered AI sidekicks. Whether it’s fetching weather data, querying a knowledge base, or interfacing with your company’s internal tools, the process is the same.