
How many times have you tried to contact a company’s customer service department only to waste time looking up the phone number or trying to find the *right* phone number to ask a simple question? Once you finally get through to someone you typically end up switching between the phone app and the company’s website or app to pass along required information to the customer service representative. It can be frustrating.
Wouldn’t it be easier to open the company’s website or app and make the call directly from the screen that has all of your information already available? For example, a customer stuck at an airport could open an airline app, initiate a voice or video call (without having to look up the customer support phone number – yeah!), and explore different flight options visually in the app as they talk with the airline representative. In cases where chat (or SMS) work better, a chat could be started directly in the app to get help. It’s a feature that I’ve always wanted in airline apps, insurance apps, HR apps, and many others to simplify the process of getting help. By adding real-time communication directly into an app, a customer can easily access information directly from the app, talk through the problem with customer service, and get a more personalized experience along the way. That’s only one of many scenarios where this technology can be used.
Using voice, video, chat, and SMS isn’t limited to customer service scenarios of course. There are many additional scenarios where employees need to talk or chat with each other as they work within an app or website. For example, a doctor may consult with a patient using an app, an Internet technician working out in the field may need to communicate with headquarters to fix a problem with a customer’s Internet connection, a mechanical engineer may need to be shown new constraints at a job site, or an architect might discuss structural modifications to a building. By integrating real-time communication directly into apps, workers can have the app open on their device, access the information they need to solve the problem, and get the audio/visual or chat help they need as well.
This is where Azure Communication Services (ACS) comes into picture.
Getting Started with Azure Communication Services
Azure Communication Service (ACS) allows you to add “real-time multimedia voice, video, and telephony-over-IP communications features” into your applications. It addition to multimedia, it can also be used to add chat and SMS functionality. Real-time multimedia capabilities can be used in website-to-website scenarios, app-to-app scenarios, and be used in a combination of those options as well. Instead of worrying about setting up and maintaining the network and servers required to support your real-time multimedia needs, you can let ACS handle that for you and stay focused on building app features. ACS is built on the same enterprise services that support Microsoft Teams (which has over 115 million active users now). In fact ACS is even interoperable with Microsoft Teams.
ACS has several different client libraries and REST APIs that can be used to integrate voice, video, chat, and SMS into an application. Currently the following languages/platforms are supported:
- JavaScript
- .NET
- Python
- Java SE
- iOS
- Android
Let’s look at the process of getting ACS setup and walk through an example application that’s available.
Step 1: Create an Azure Communications Service Resource in the Azure Portal
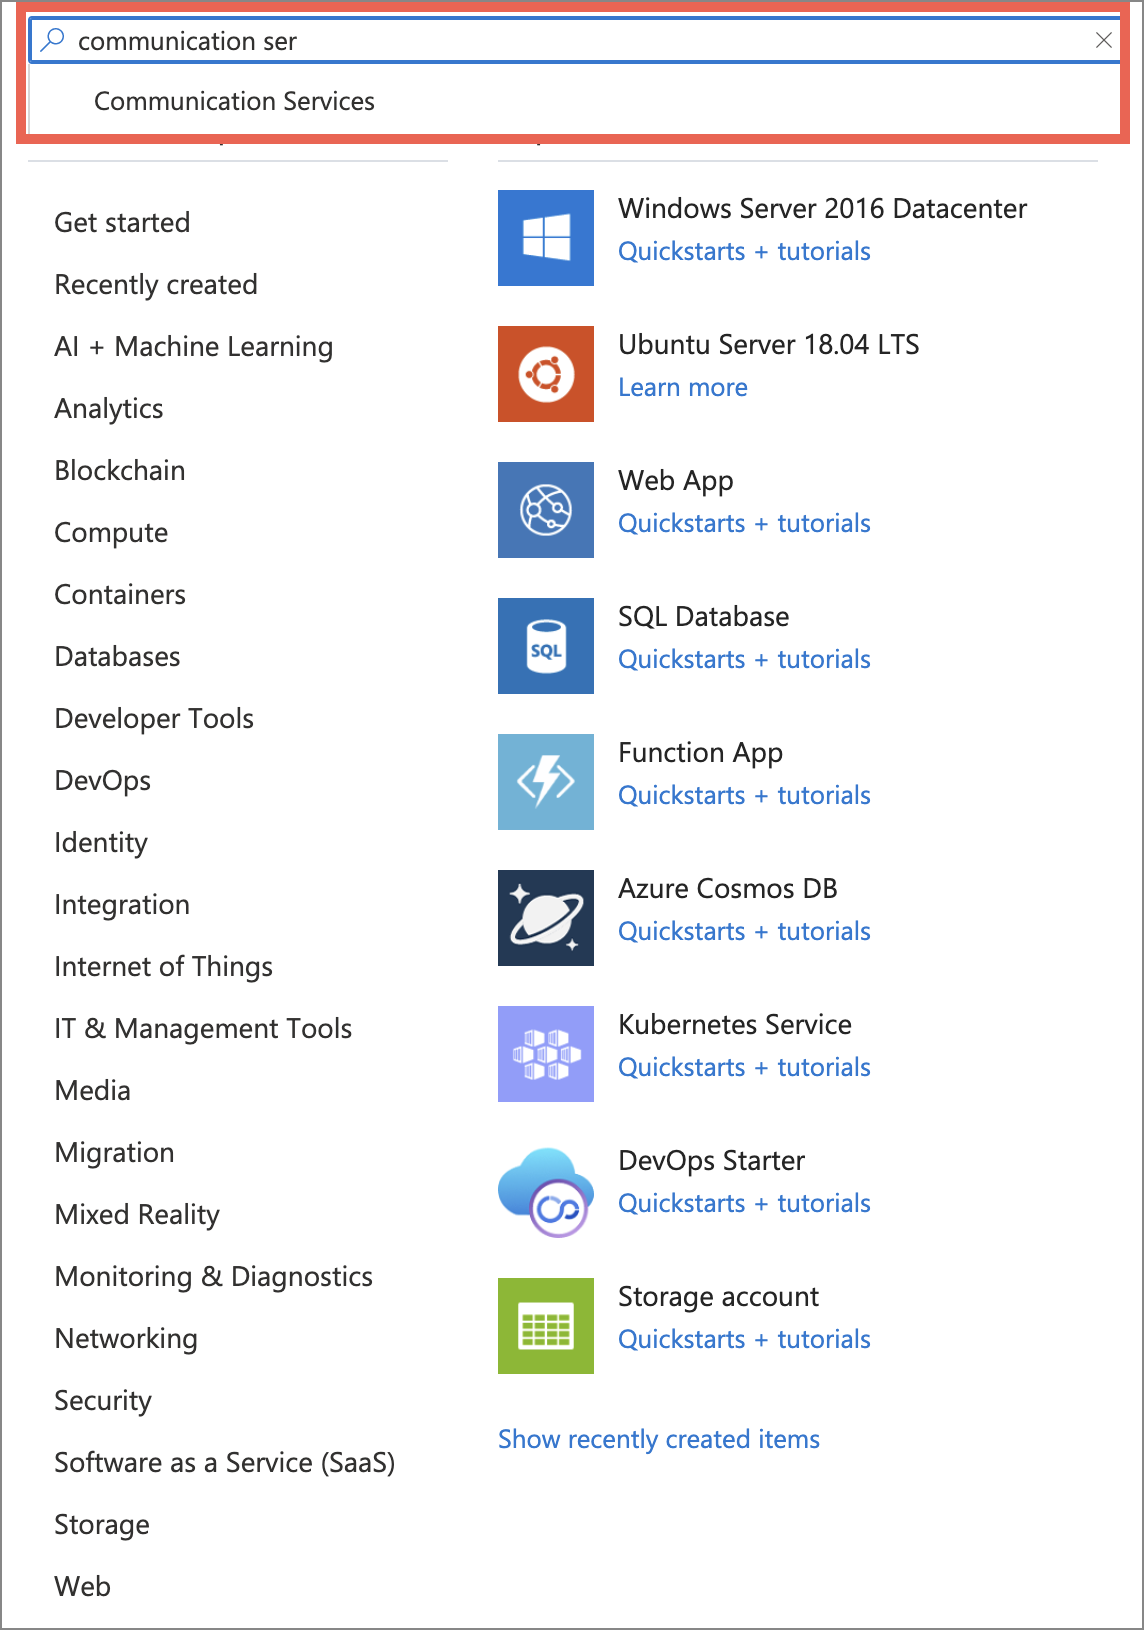
To get started visit https://portal.azure.com, login to the portal, and select Create a resource. In the Search the Marketplace textbox enter Communication Services and select that service once it is displayed.
NOTE: If you don’t have an Azure account you can get a free one here.
You’ll be taken to the ACS resource page where you can select the Create button to get started.
To create an ACS resource you’ll select your subscription and resource group names, enter the ACS resource name you’d like to use, and select your data location:
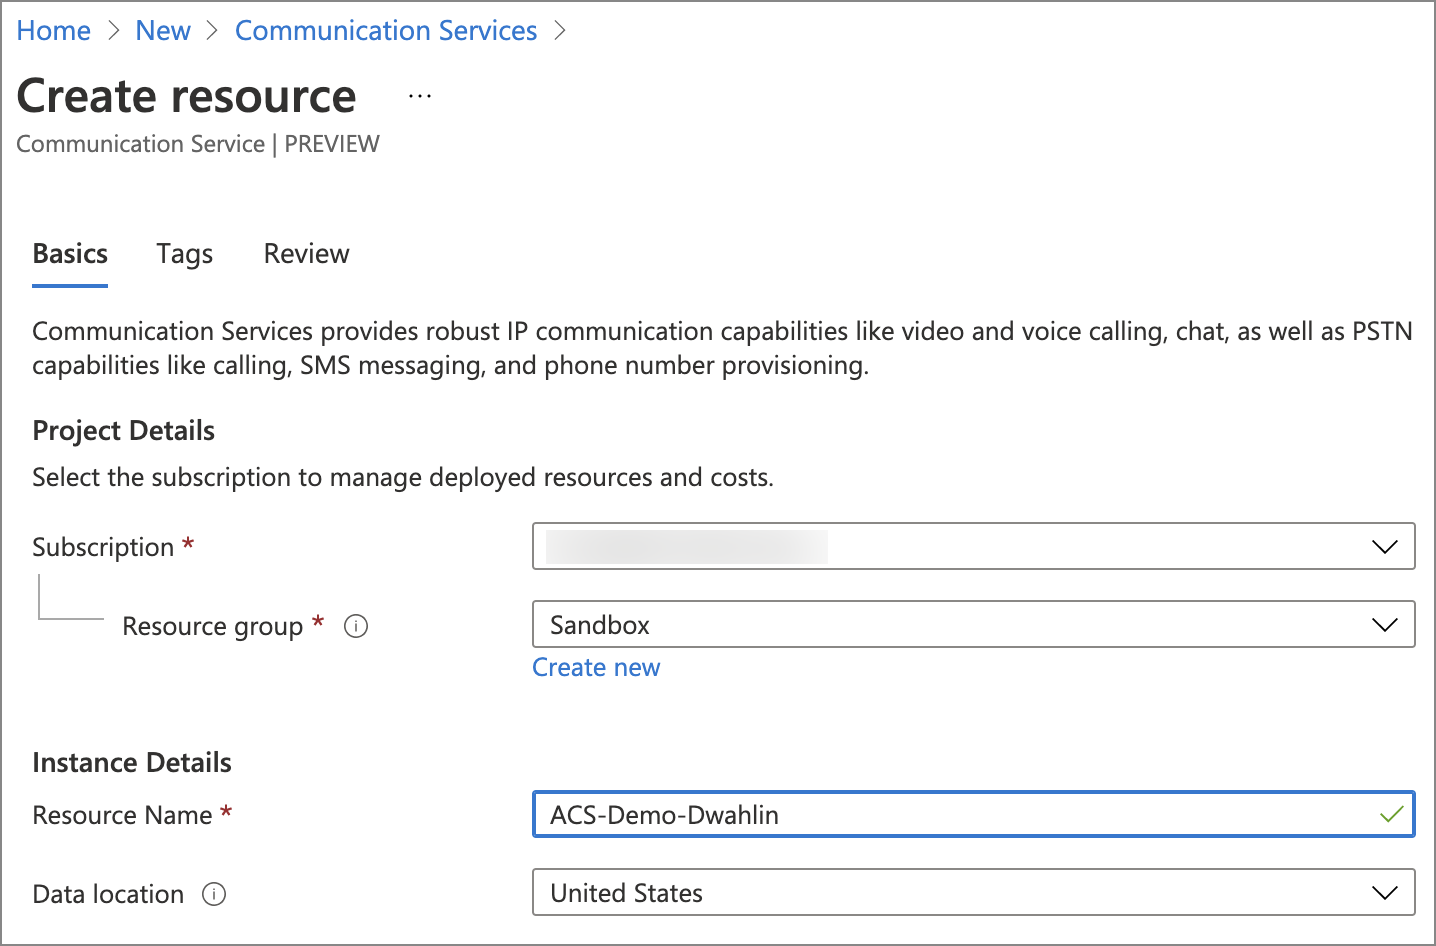
Select the Review + Create button, review your details, and then select the Create button to get started.
After the ACS resource is created you’ll see the standard overview page with information about your new ACS resources. Select the Keys option in the navigation menu to the left to view the keys and connection strings that can be used to authorize API calls from your client to ACS.
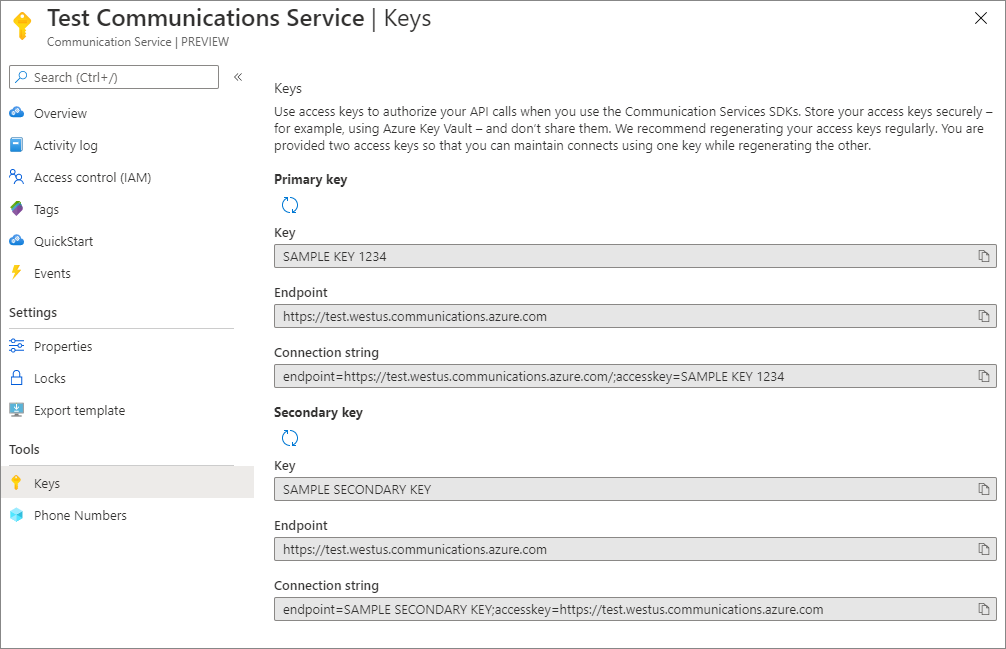
Note the Primary key connection string that is listed. You’ll use it in the next step.
NOTE: If you prefer to use the Azure CLI, you can create and show an ACS resource using the following commands:
# If you don't have the az communication extension installed run the following:

az extension add --name communication

# Create the Azure Communication Services resource

az communication create --name "<communicationName>" --location "Global" --data-location "United States" --resource-group "<resourceGroup>"

az communication show --name "<communicationName>" --resource-group "<resourceGroup>"
Step 2: Clone the Communication Services Web Calling Hero Example
Now that you have an ACS resource setup in Azure you can clone an example called “Web Calling Hero” from Github. This example uses a .NET Core backend with a React frontend. If you don’t have .NET Core 3.1 or higher installed you can visit https://dotnet.microsoft.com/download to get it installed quickly and easily on Windows, Mac, or Linux. It’s important to note that while this sample uses .NET Core for the backend, there are several other options available as mentioned earlier.
Open a terminal window, navigate to the directory where you’d like to clone the example on your machine, and run the following command:
git clone https://github.com/Azure-Samples/communication-services-web-calling-hero.gitIf you use VS Code, cd into the new directory that was created and type code . to open the editor. There’s no requirement to use VS Code of course so if you prefer another editor open the new directory in it.
Open the Calling/appsettings.json file, locate the ResourceConnectionString property, and replace the value with the connection string you saw earlier in the ACS Keys page in the Azure Portal. Save the file once you’re done.
Open a terminal window in the project’s Calling folder and run the following command to restore dependencies and build the project:
dotnet buildNOTE: The first time I ran the build I received an error about a missing build assembly which was puzzling. I ran dotnet clean but still got the error. I finally ran the build again, got the error, and manually deleted the bin and obj folders and then things worked fine.
Once the project builds successfully start the server by running the following command:
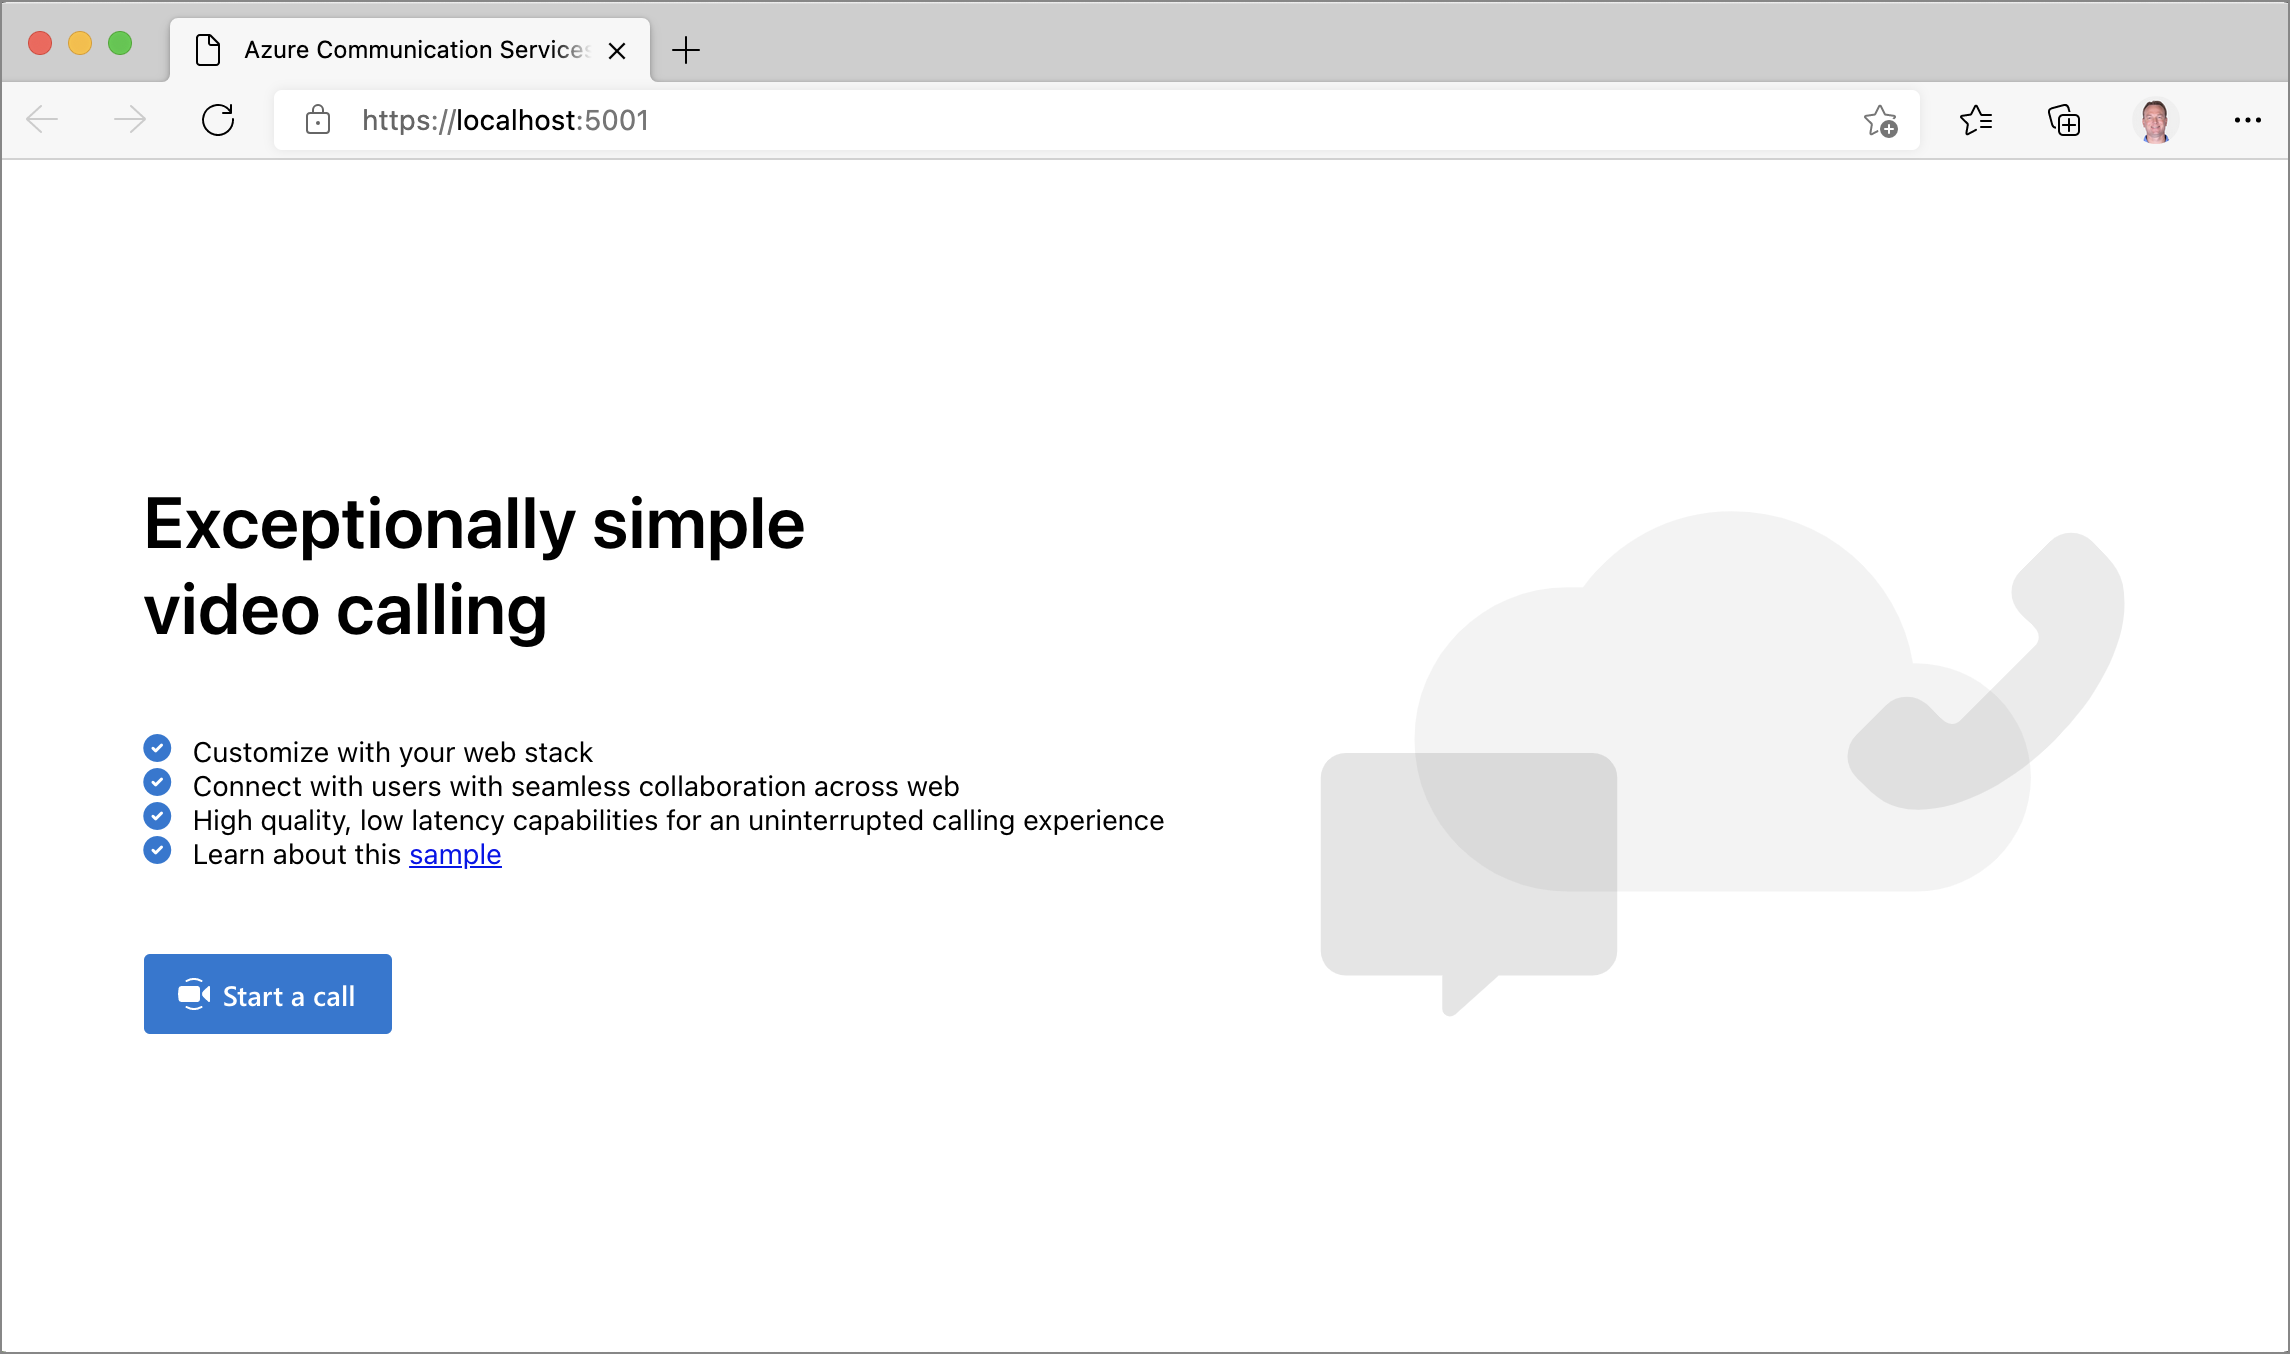
dotnet runThis will startup the app server and expose port 5001. Visit https://localhost:5001 in your browser to see the homepage of the application. You should see a page similar to the following.
NOTE: If you haven’t created a developer certificate on your machine you may receive a certificate error when first viewing the page in the browser. If that’s the case, stop the server in the terminal window and run dotnet dev-certs https -t to add and trust a developer certificate on your machine. Once the cert is created run dotnet run again to start the server.
Click the Start a call button to initiate a call and you’ll be taken to another screen that prompts you to allow access to your microphone and camera:
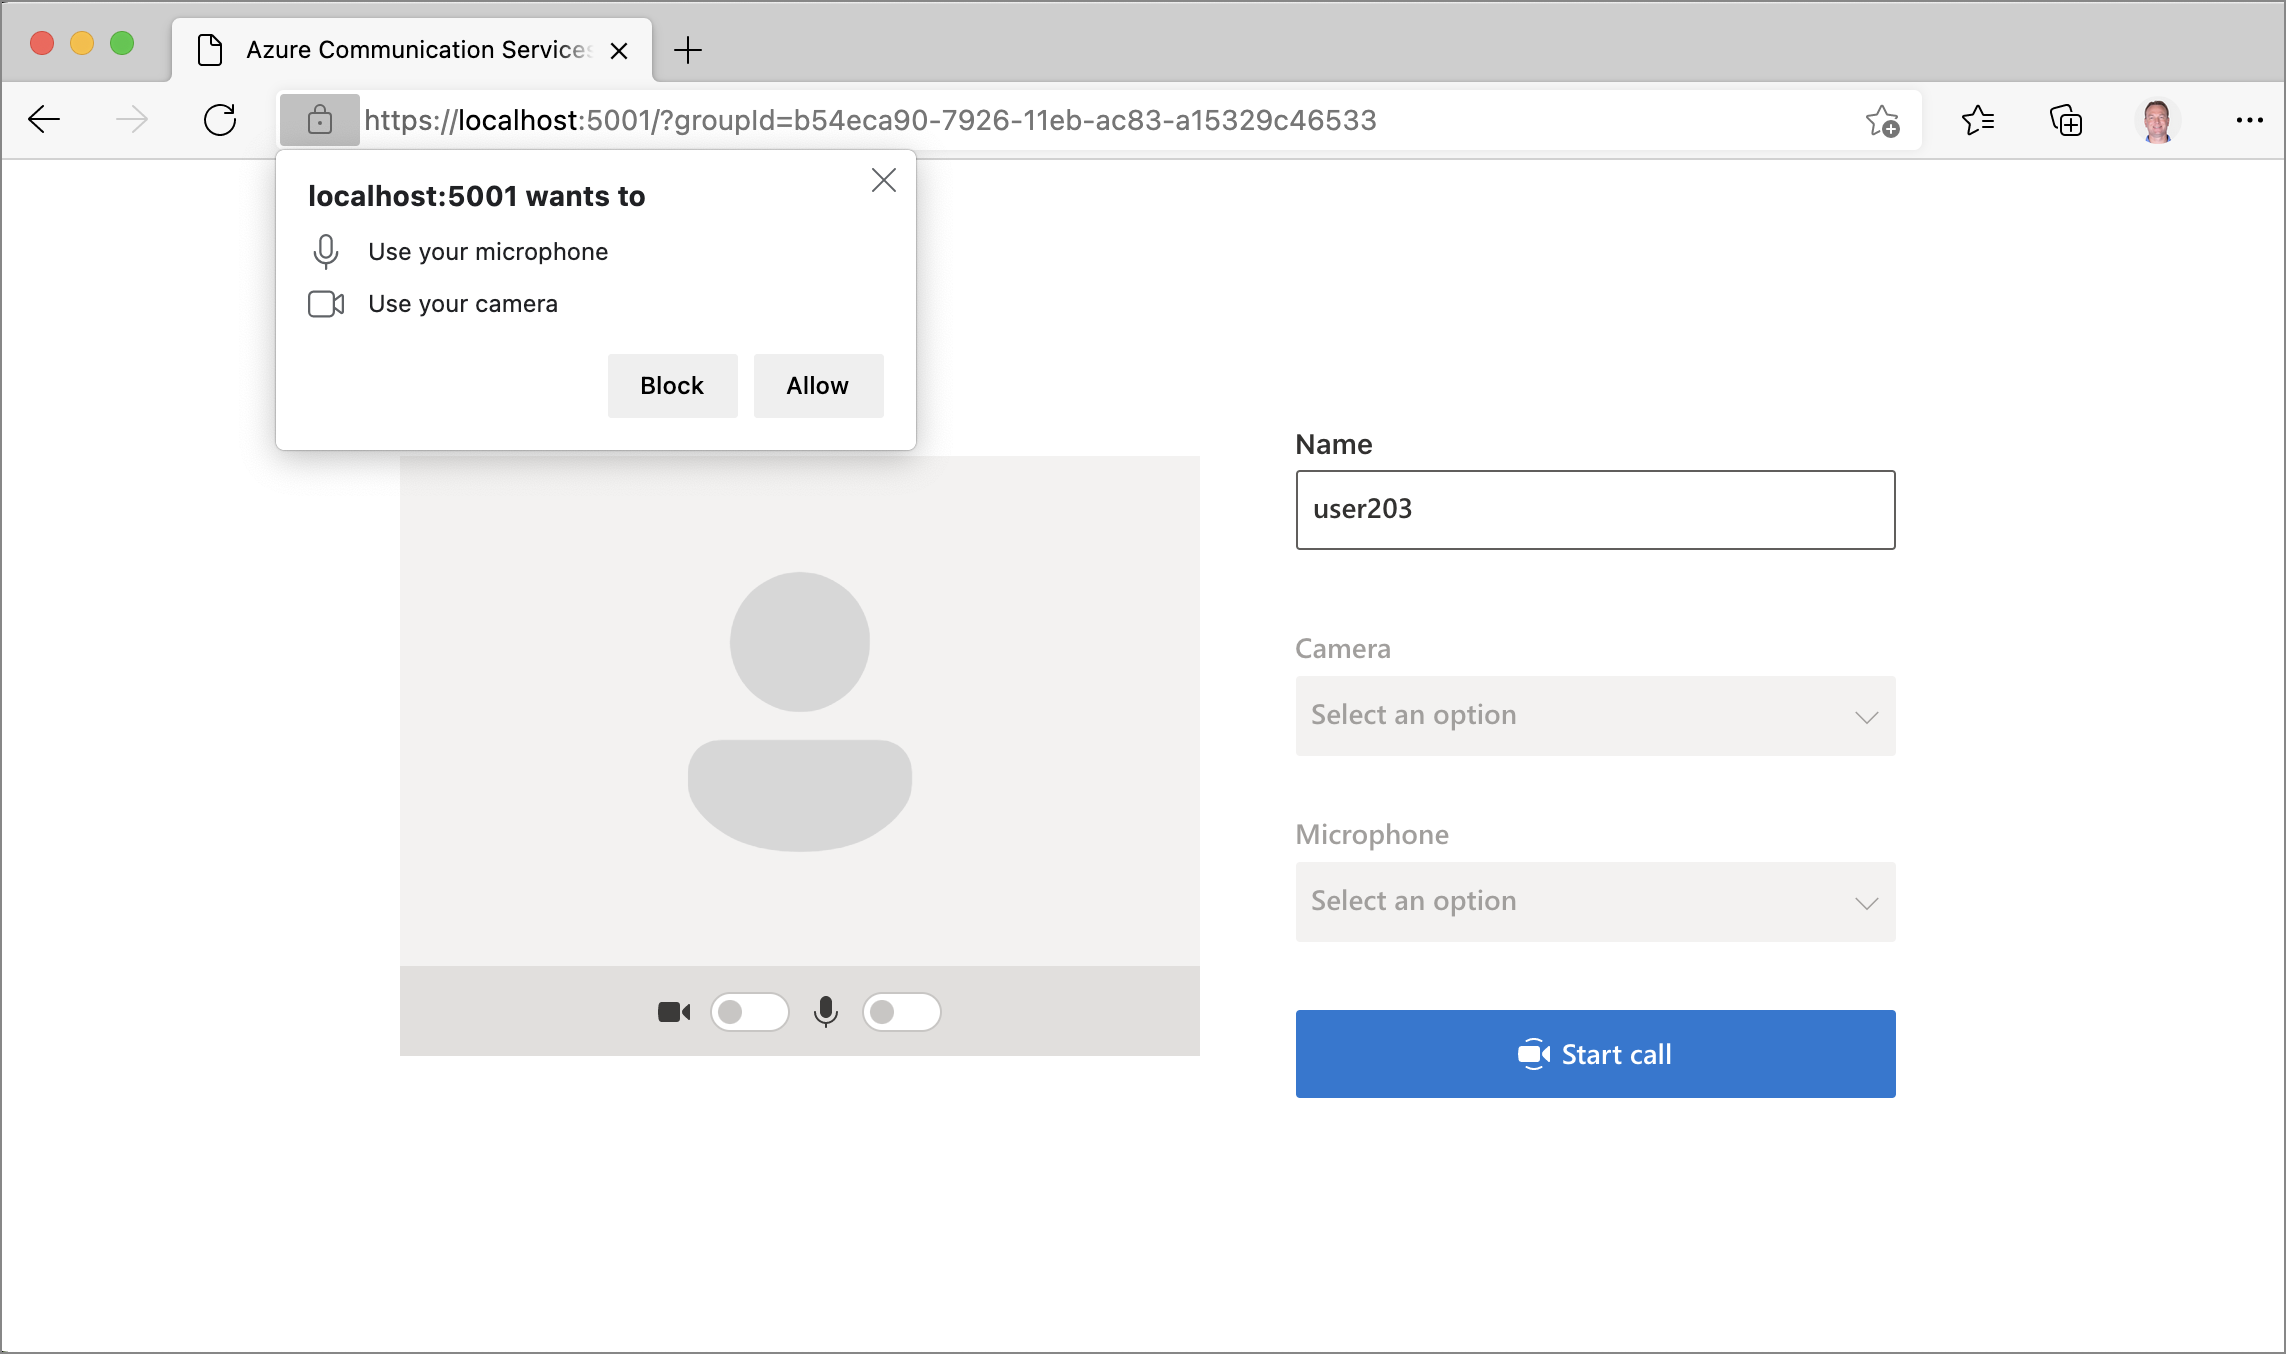
After allowing access, select the appropriate devices you want to use in the drop-down boxes to the right. After selecting them, toggle your camera and microphone to test things out:

Once you’re ready, click the Start call button.
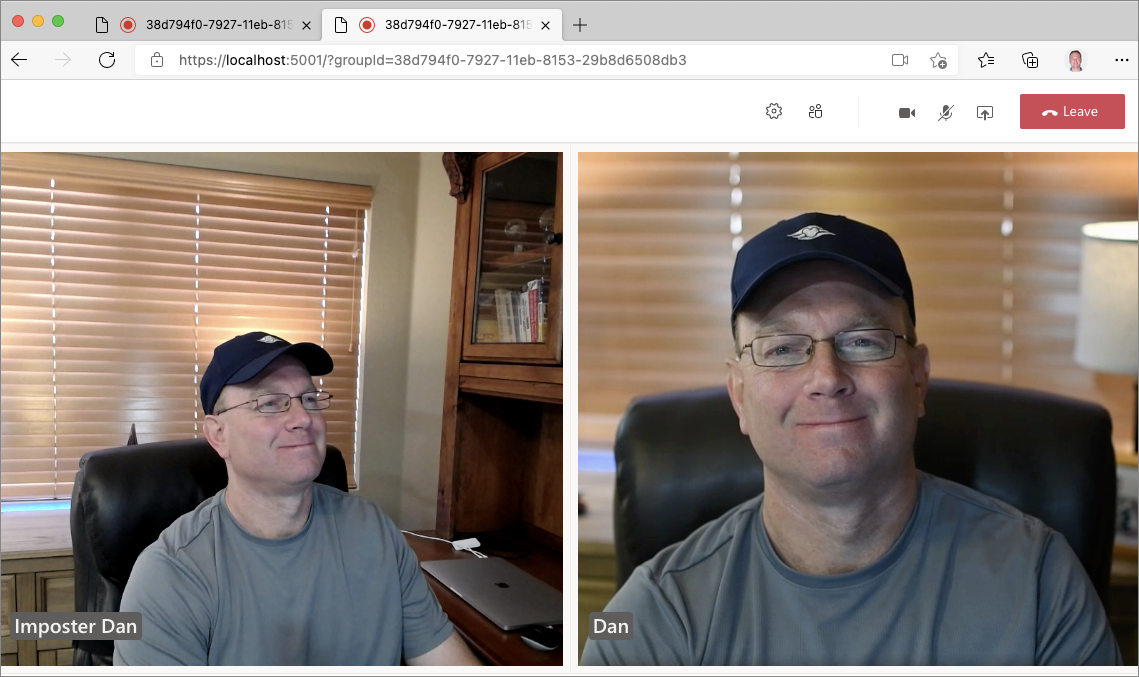
It takes at least two people to talk of course, but since you’re on localhost you can only invite yourself to a call. It works though for testing purposes. If you click the invite people icon (see below), select the Copy join info, paste the link in another tab, and then choose a different camera/mic (if you have one available), you can see how it works.

Here’s an example of what a call looks like. This call was between myself and some imposter version of myself:
If you deploy the app to Azure or use a tool like ngrok to expose it publicly (for testing purposes) you can invite others to join and have a call directly in the web application. This same type of functionality can be added to your mobile and desktop apps as well!
NOTE: If you use ngrok to expose localhost publicly (for testing purposes) you’ll need to run the following command for it to work properly: ngrok http https://localhost:5001 -host-header=”localhost:5001″
So what’s the magic that makes all of this work? The short answer is Microsoft Teams services but that functionality is wrapped up in ACS packages that you can use directly in your apps. Let’s explore a few portions of the code in this sample app.
Step 3: Exploring the Code
Backend Code
Let’s start by looking at the backend code. First off, two ACS assemblies are included in the project’s Calling.csproj file:
  <ItemGroup>
    <PackageReference Include="Azure.Communication.Administration" Version="..." />
    <PackageReference Include="Azure.Communication.Common" Version="..." />
    ...
  </ItemGroup>
Open Calling/Controllers/UserTokenController.cs and notice the Azure.Communication.* namespaces imported at the top of the file. Looking through the code you’ll notice the following:
- The constructor loads the ACS connection string from the appsettings.json file that you explored earlier.
public UserTokenController(IConfiguration configuration)
{
    _client = new CommunicationIdentityClient(configuration["ResourceConnectionString"]);
}- The GetAsync() REST API function creates a CommunicationUser object, issues a token, and returns a token response. The token is used by the frontend client to connect with ACS services (more on that in a moment).
public async Task<IActionResult> GetAsync()
{
    try
    {
        Response<CommunicationUser> userResponse = await _client.CreateUserAsync();
        CommunicationUser user = userResponse.Value;
        Response<CommunicationUserToken> tokenResponse =
            await _client.IssueTokenAsync(user, scopes: new[] { CommunicationTokenScope.VoIP });
        string token = tokenResponse.Value.Token;
        DateTimeOffset expiresOn = tokenResponse.Value.ExpiresOn;
        return this.Ok(tokenResponse);
    }
    catch (RequestFailedException ex)
    {
        Console.WriteLine($"Error occured while Generating Token: {ex}");
        return this.Ok(this.Json(ex));
    }
}
That’s it for the backend code!
Frontend Code
The bulk of the application functionality is handled by the frontend code which is written with TypeScript and React and located in the Calling/ClientApp/src directory. The app relies on the FluentUI library for some of the base controls, styles, and icons that are used.
Open package.json and you’ll see the following ACS packages included:
- @azure/communication-calling
- @azure/communication-common
These packages provide the audio, video and device selection functionality needed by the application. Now let’s explore a few key parts of the frontend codebase.
Remember the token issuer backend API that you looked at earlier? When the frontend app is ready to start a call, the code retrieves the token from the backend API. This is handled by the Utils/Utils.ts file:
getTokenForUser: async (): Promise<any> => {
  const response = await fetch('/userToken');
  if (response.ok) {
    return response.json();
  }
  throw new Error('Invalid token response');
}
The token is used in core/sideEffects.ts to create an AzureCommunicationUserCredential which is then used to create a call agent:
  const tokenCredential = new AzureCommunicationUserCredential(userToken);
  let callAgent: CallAgent = await callClient.createCallAgent(tokenCredential);
The project’s components directory has the main components used in the application while the containers and core directories have supporting files used for state management. Although there are quite a few components running on the frontend, one of the key components is named GroupCall. It’s located in the components/GroupCall.tsx file.
The GroupCall component imports several ACS types and delegates functionality to a child component named MediaGallery. MediaGallery handles displaying the local and remote video streams for a call.
  <Stack.Item grow styles={!activeScreenShare ? activeContainerClassName : hiddenContainerClassName}>
    <MediaGallery />
  </Stack.Item>
Here’s a snippet from the MediaGallery component’s tsx. Notice that it includes RemoteStreamMedia and LocalStreamMedia child components.
const getMediaGalleryTilesForParticipants = (participants: RemoteParticipant[], userId: string, displayName: string) => {
  // create a RemoteStreamMedia component for every remote participant
  const remoteParticipantsMediaGalleryItems = participants.map((participant) => (
    <div className={mediaGalleryStyle}>
      <RemoteStreamMedia
        key={utils.getId(participant.identifier)}
        stream={participant.videoStreams[0]}
        label={participant.displayName ?? utils.getId(participant.identifier)}
      />
    </div>
  ));

  // create a LocalStreamMedia component for the local participant
  const localParticipantMediaGalleryItem = (
    <div key={userId} className={mediaGalleryStyle}>
      <LocalStreamMedia label={displayName} stream={props.localVideoStream} />
    </div>
  );
The LocalStreamMedia and RemoteStreamMedia components handle rendering the appropriate video streams. Here’s a snippet from the RemoteStreamMedia component file. It uses an ACS Renderer object to handle rendering the appropriate view for the video stream.
  const renderStream = async () => {
    var container = document.getElementById(streamId);

    if (container && props.stream && props.stream.isAvailable) {
      setAvailable(true);

      var renderer: Renderer = new Renderer(props.stream);
      rendererView = await renderer.createView({ scalingMode: 'Crop' });

      // we need to check if the stream is available still and if the id is what we expect
      if (container && container.childElementCount === 0) {
        container.appendChild(rendererView.target);
      }
    } else {
      setAvailable(false);

      if (rendererView) {
        rendererView.dispose();
      }
    }
  };
Although chat isn’t included in this app, you can clone the repo at https://github.com/Azure-Samples/communication-services-web-chat-hero, update the connection string for your ACS resource in Azure in appsettings.json, and run the app to try it out. Check out the Chat/ClientApp/src/components/ChatScreen.tsx component to learn more about how it works or see the link to the chat docs in the Additional Resources section below.
While this walkthrough only scratches the surface, it should give you an idea of what can be done with Azure Communication Services and help you get started using it. A more simple “vanilla JavaScript” walkthrough can be found here if you’re interested:
Quickstart: Add voice calling to your app
Conclusion
In today’s connected world users expect to be able to press a button to start a call, initiate a chat, or send an SMS message. While that type of functionality has been baked into mobile devices for years, the ability to add audio, video, chat, and SMS into the applications your customers and employees use everyday can enhance their productivity and efficiency in many scenarios.
If you’re interested in learning more about Azure Communication Services visit the docs listed in the Additional Resources below. You can also watch a video I put together that discusses Azure Communication Services and shows the calling “hero” demo in action.
Additional Resources:
- Azure Communication Service Docs
- Communication Services Web Calling Hero Demo
- Communication Services Chat Hero Demo
- Using Voice and Video
- Using Chat
- Using SMS
- Azure Communication Services Pricing