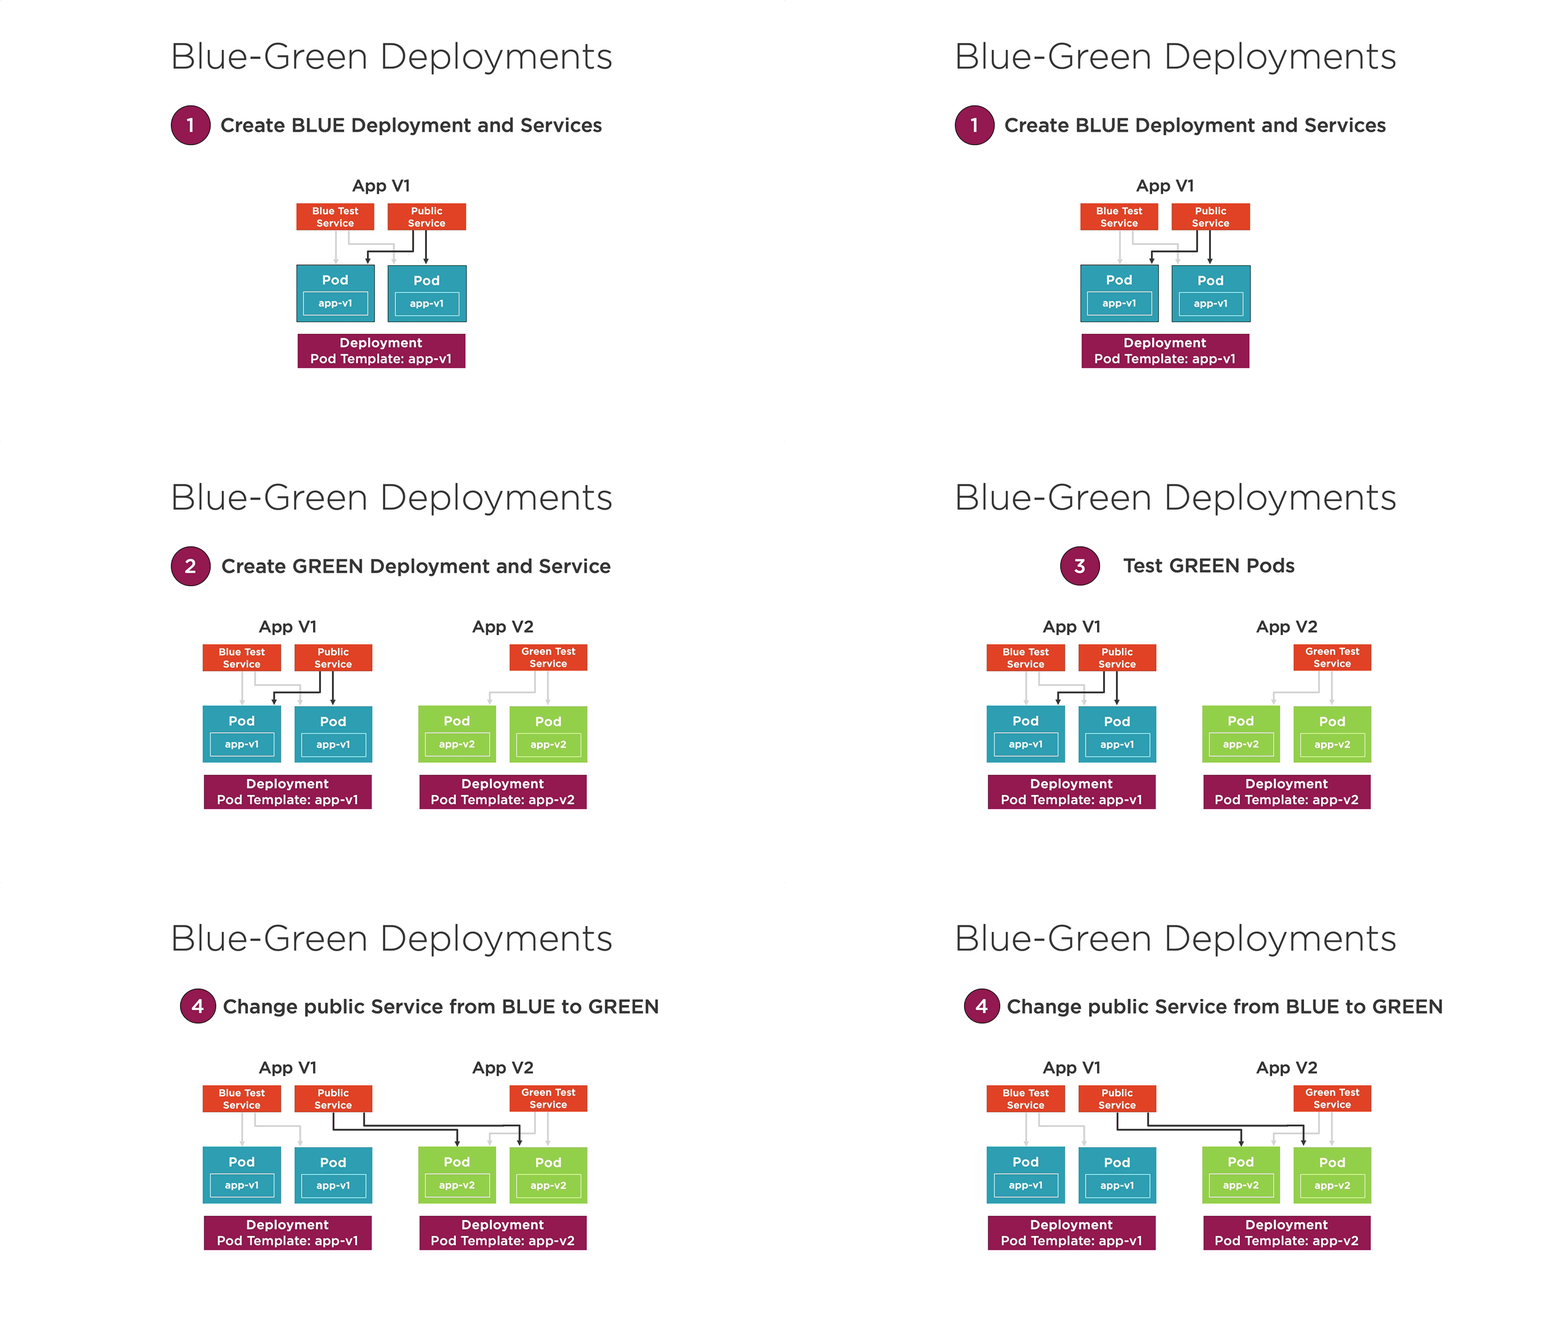
I’ve been working with Kubernetes a lot and focusing on various deployment techniques that can be used (such as Blue-Green Deployments) for a Pluralsight course I’m creating called Kubernetes for Developers: Deploying Your Code. If you’re new to Blue-Green Deployments, here’s a quick overview:

While I was working on the course, Dr. Christian Geuer-Pollmann and I had chatted on Twitter about a Blue-Green dashboard he wrote. He did a great job on it! I’ve been wanting to experiment with the JavaScript Kubernetes Client library so I decided to see what could be done to create a simple Blue-Green Deployment “dashboard” in an hour or so one night. It’s not nearly as good as Christian’s, but since it shows some of the features the library provides I decided to do a quick write-up about the code.
Here’s an example of what my “dashboard” (if you want to call it that – yes, it’s pretty basic) generates in the console.
Deployment              Role   Status   Image        Ports     Services
----------------------  -----  -------  -----------  --------  ----------------
nginx-deployment-blue   blue   running  nginx-blue   80, 9000  nginx-blue-test, nginx-service
nginx-deployment-green  green  running  nginx-green  9001      nginx-green-test
You can see that it lists information about the blue and green Deployments as well as their associated Services. There’s nothing revolutionary about it at all, but that wasn’t really the point of this exercise. I wanted to see how easy it would be to use the library to interact with Kubernetes and access information about different resources. Although it took a little searching to get started, once I knew the proper objects to use it was pretty straightforward.
Before going too far it’s important to note that I ran this from a machine that had rights to access the Kubernetes API using the kubectl command-line tool.
Creating the Initial Project
I started things off by creating a new package.json file using npm init. I then installed the following dependencies:
npm install typescript --save-dev
npm install @kubernetes/client-node
npm install easy-table
Next, I added a tsconfig.json file since I wanted to use TypeScript. I could have just as easily used JavaScript as well but since I’m a big TypeScript fan I went that direction. Because this was a quick experiment I didn’t fully leverage TypeScript, but I can easily add more type information in the future if I ever circle back to the project. It was nice to get great code help/intellisense in VS Code as I was hunting and pecking my way through the API.
Once the project was created I added a dashboard.ts file which is responsible for querying Kubernetes, finding specific Deployments and Services, and rendering the desired data to the console using the easy-table npm package.
Using the k8s.KubeConfig() Function
Jumping to the dashboard.ts file, I got started by importing two packages:
import * as k8s from '@kubernetes/client-node';
import * as Table from 'easy-table';
The @kubernetes/client-node package is used to query Kubernetes resources and easy-table handles writing the retrieved data out to the console.
Next I needed to create a new k8s.KubeConfig() object that could be used to integrate with the Kubernetes API:
const kc = new k8s.KubeConfig();
kc.loadFromDefault();
The KubeConfig object provides a makeApiClient() function that can be used to perform queries. I needed to query the k8s.AppsV1API (it allows access to app/v1 resources such as Deployments) and k8s.CoreV1Api (it allows access to core Kubernetes resources such as Services).
const appsV1Api = kc.makeApiClient(k8s.AppsV1Api);
const coreV1Api = kc.makeApiClient(k8s.CoreV1Api);
const roles = ['blue', 'green'];
From there I needed to query the cluster’s Deployments and Services using a getDeployments() function.
getDeployments().catch(console.error.bind(console));Querying Deployments
Once the API client objects were created I used them to query the Deployments and their associated Services. First, a getDeployments() function was created. This function is responsible for retrieving Blue-Green Deployments and their associated Service information.
async function getDeployments() {
  // get Deployments and Services
}
Here’s how to query Deployments in the default namespace and look for Labels that have a role set to either blue or green using the appsV1Api object shown earlier:
// get Deployments
const deploymentsRes = await appsV1Api.listNamespacedDeployment('default');
let deployments = [];
for (const deployment of deploymentsRes.body.items) {
    let role = deployment.spec.template.metadata.labels.role;
    if (role && roles.includes(role)) {
        deployments.push({
            name: deployment.metadata.name,
            role,
            status: deployment.status.conditions[0].status,
            image: deployment.spec.template.spec.containers[0].image,
            ports: [],
            services: []
        });
    }
}
Looking through this code you’ll notice that I’m able to access the Labels within the Deployment template, metadata about the Deployment, the status of the container, the container image, and more.
Querying Services
Once a blue or green Deployment was found, I used it to find Kubernetes Services associated with the Deployment. This was done using the coreV1Api object shown earlier.
// get Services
const servicesRes = await coreV1Api.listNamespacedService('default');
for (const service of servicesRes.body.items) {
    if (service.spec.selector && service.spec.selector.role && roles.includes(service.spec.selector.role)) {
        let filteredDeployments = deployments.filter(d => {
            return d.role === service.spec.selector.role;
        });
        if (filteredDeployments) {
            for (const d of filteredDeployments) {
                d.ports.push(service.spec.ports[0].port);
                d.services.push(service.metadata.name);
            }
        }
    }
}
This code queries the Services, looks to see if they’re associated with a blue or green Deployment by looking at the service’s selector, finds the associated Deployment object, and then updates it with the appropriate port and Service name information.
Rendering Data
The final part of the code handles rendering the retrieved Deployment and Service data to the console using easy-table.
renderTable(deployments);Here’s the code for the renderTable() function:
function renderTable(data, showHeader = true) {
    const table = new Table();
    for (const d of data) {
        d.services.sort();
        d.ports.sort();
        table.cell('Deployment', d.name);
        table.cell('Role', d.role);
        table.cell('Status', d.status ? 'running' : 'stopped');
        table.cell('Image', d.image);
        table.cell('Ports', d.ports.join(', '));
        table.cell('Services', d.services.join(', '))
        table.newRow();
    };
    table.sort(['Role|asc']);
    if (showHeader) {
        console.log(table.toString());
    } else {
        console.log(table.print());
    }
}
You can find more information about easy-table at https://github.com/eldargab/easy-table.
Summary
Although this is a basic use case for the JavaScript Kubernetes Client library, it offers a lot of promise in more robust scenarios where Kubernetes resources need to be queried. There’s a lot more that could be added to the code (better error handling for example), but hopefully it provides a nice starter if you’re interested in querying your Kubernetes cluster using the JavaScript library.
Additional libraries are also available for Java, Go, Python, C#, and other languages/frameworks which is super nice. The full code shown in this post can be found here. The readme file provides information about how to build and run the project.


