Scenario-Driven Development (SDD) – a term I’d heard little about until my friend Justin Couto encouraged me to check out his team’s Angular Playground tool. SDD didn’t mean much to me when I first heard about it, but I decided to look into Angular Playground more and had one of those “light bulb” moments after I got it up and running. SDD was extremely cool….once I understood what it was all about!
Angular Playground is a relatively new tool from the SoCreate team (and former team member Justin Schwartzenberger) that allows you to build and run Angular components in isolation (note that you can also use it to develop pipes and directives in isolation too). What exactly does that mean? Normally when you create a component you need to fire up the entire application to try it out. While that’s not a huge deal for small apps, it can be painful for larger apps especially if you have to drill-down into the app to get to the component you’re building. If you’re creating a child component you may have to wait until the parent component (which may be responsible for passing data to the child component) is ready to go. Sure, you can always fake the data in the child, but how do you run the child if there’s no parent component in the app yet? You either mock the parent component or create an isolated view that only uses the child component. Either approach means adding code that you’ll eventually end up throwing out. You may also be developing a component that will get data from a service that doesn’t exist quite yet. With the playground, it’s easy to do that too.
With Angular Playground you can develop and run a component in complete isolation – in its own sandbox. Each component in an app can be completely isolated from other components and you can apply different “scenarios” to a given component. For example, let’s say you have a customer details component in your application. Here are a few examples of scenarios that might be added to the component’s sandbox:
| Scenario 1: | Display the component with a lot of data |
| Scenario 2: | Display the component with a subset of data |
| Scenario 3: | Display the component without any data |
| Scenario 4: | Display the component with different component styles applied (could be several different scenarios for this one) |
| Scenario 5: | Display the component with different CSS classes applied to the component selector |
| Scenario 6: | Many more scenarios could potentially be added as needed… |
Normally doing these types of things can be a fair amount of work, but with Angular Playground, you can create a sandbox for the component and then define multiple scenarios. As you build the component, you can quickly flip through the different scenarios to see how the component looks and debug it as well since it’s running directly in the browser. To clarify, this isn’t end-to-end testing or really any type of testing per se. It’s isolating the component into its own sandbox while you develop it to make it quicker and easier to see the component in different scenarios (such as different types of data being passed), have different look/feel scenarios if you haven’t finalized the look/feel yet, experiment with different quantities of data for responsive design work, and much more.
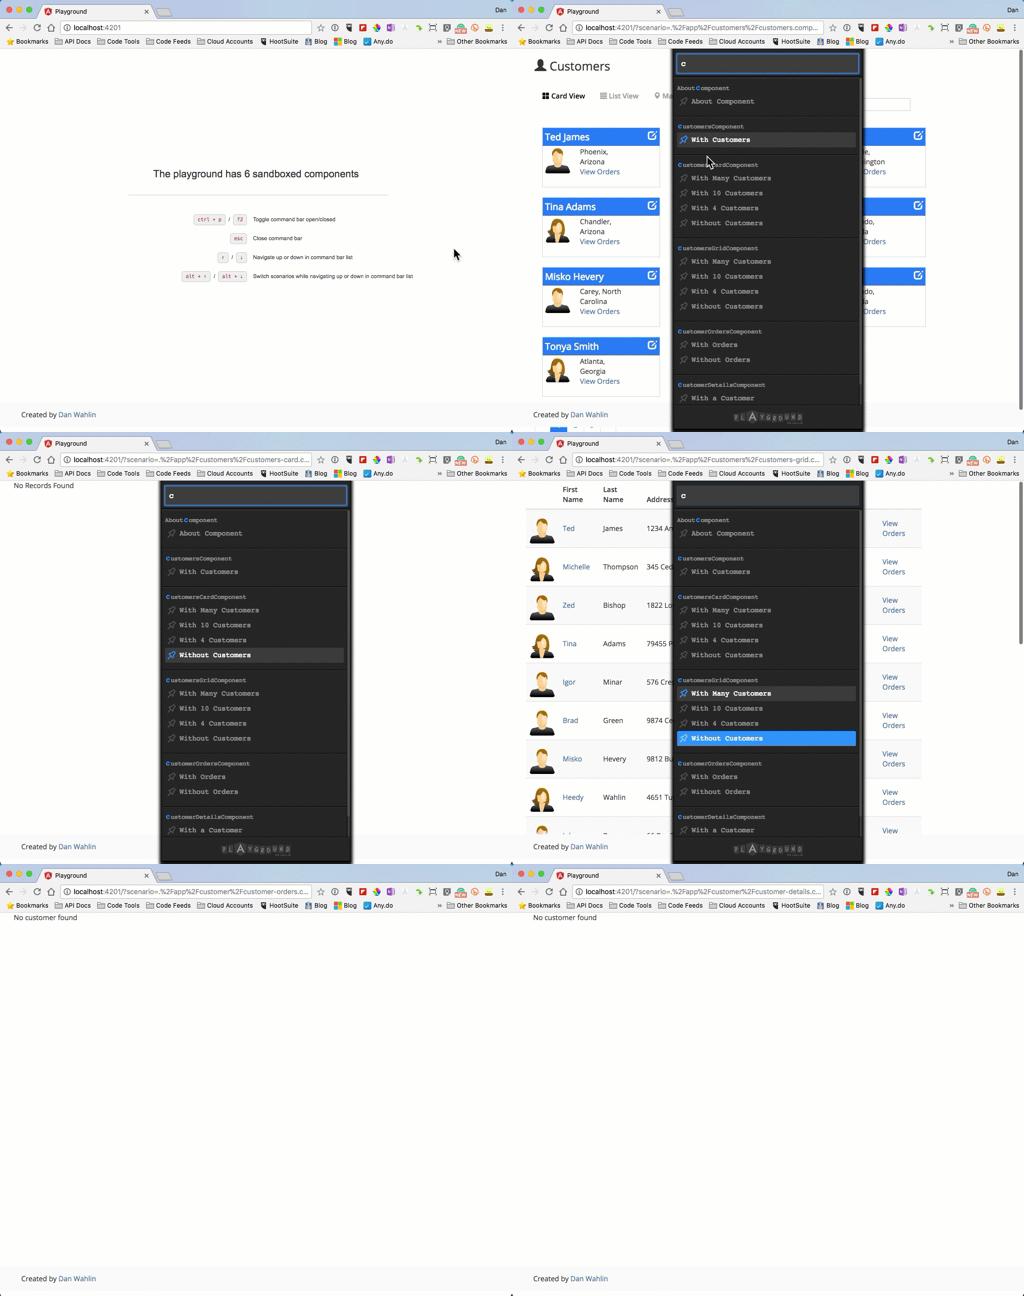
Here’s an example of running different components using Angular Playground each with their own sandbox and scenarios:
Getting Started with Angular Playground
UPDATE: Angular Playground can now be installed quickly and easily using the Angular CLI 6+! One simple command and you’re ready to go:
ng add angular-playground
See http://www.angularplayground.it/docs/getting-started/angular-cli for details.
If you’re not on Angular 6+, here’s a quick walk-through on how you can get the playground going.
To get started with Angular Playground you’ll want to walk-through the help docs available on their website. I use the Angular CLI so I went through those docs and performed the following tasks:
- Installed the Playground CLI:
npm i angular-playground --save-dev
- Added a main.playground.ts file to bootstrap the playground environment
- Modified .angular-cli.json
- Added an angular-playground.json file
- Modified the tsconfig.app.json file
- Add the following to the scripts section of package.json:
"playground": "angular-playground"
It took me around 5 minutes or so to make the modifications – a really simple process that they walk you through step-by-step.
Creating Component Sandboxes
Once you have the Angular Playground CLI tool in place you can run npm run playground to start the sandbox process. This will create a sandboxes.ts file in your src folder and start ng serve.
The next task you’ll perform is to create your first sandbox. I started with a very basic component named AboutComponent since it displays static data. I added an about.component.sandbox.ts file in the about feature folder at the same level as the component file (you can certainly put sandbox files in a subfolder if desired as well):
import { sandboxOf } from 'angular-playground';
import { AboutComponent } from './about.component';

export default sandboxOf(AboutComponent)
  .add('About Component', {
    template: `<cm-about></cm-about>`
  });
This creates a single scenario that runs the component. To try it out I went to http://localhost:4201 in the browser (recall that I ran npm run playground earlier to start the playground process) and pressed ctrl + p. I then typed the name of the scenario (the letter “A” will do here) in the command bar search box to select and run the about component. This particular scenario isn’t very interesting given the static data, but it made it easy to check if I had everything configured correctly for the playground to run.
Next, I decided to create multiple scenarios for a customer details component that I had in one of the sample apps we use in our Angular Development training classes called Angular JumpStart. The customer details component is more involved due to ActivatedRoute (for accessing route parameter data) and DataService being injected into the constructor. I created a few mock classes, functions and variables for routing and for the data service and was off and running fairly quickly.
Here are the two scenarios added for the customer details component. The first provides data to the component and the second runs the component without any data to see how it responds.
import { sandboxOf } from 'angular-playground';
import { SharedModule } from '../shared/shared.module';
import { CoreModule } from '../core/core.module';
import { DataService } from '../core/services/data.service';
import { CustomerDetailsComponent } from './customer-details.component';
import { MockDataService, MockActivatedRoute, getActivatedRouteWithParent } from '../shared/mocks';
import { ActivatedRoute } from '@angular/router';

const sandboxConfig = {
  imports: [ SharedModule, CoreModule ],
  providers: [
      { provide: DataService, useClass: MockDataService },
      { provide: ActivatedRoute, useFactory: () => {
        let route = getActivatedRouteWithParent([{ id: '1' }]);
        return route;
      }}
  ],
  label: 'Customer Details Component'
};

export default sandboxOf(CustomerDetailsComponent, sandboxConfig)
  .add('With a Customer', {
    template: `<cm-customer-details></cm-customer-details>`
  })
  .add('Without a Customer', {
    template: `<cm-customer-details></cm-customer-details>`,
    providers: [
      { provide: ActivatedRoute, useFactory: () => {
        let route = getActivatedRouteWithParent([{ id: null }]);
        return route;
      }}
    ]
  });
After getting the scenarios in place I pressed ctrl + p again, typed “C” into the command bar that appears, selected the correct scenario for the customer details component, and was able to see the component live in its own sandbox. As a quick side note, when the scenario command bar displays you can use the up and down arrows to move around (see these docs for details on navigating between scenarios).
At this point, I thought to myself, “this is very cool”! No need to load the entire app to try out the component while developing it. I could even build and run a child component (which the customer details component is actually) in a completely isolated way without the parent component being present. As I made changes to the component and saved the file, the current scenario automatically refreshed the browser.
You can find additional sandbox examples from the Angular JumpStart app below:
Conclusion
Although this post only scratches the surface of Angular Playground, I hope it gives you an idea of what’s possible. Scenario-Driven Development is a great way to build and run your components in their own sandbox with multiple scenarios. I can definitely see how using the playground can significantly speed up development time and increase overall productivity.
Check out the Angular Playground site for more information or give the Angular JumpStart app a try and see the playground in action. The readme file has all of the details on how to run the app and the playground.


